’s Web Site")


|
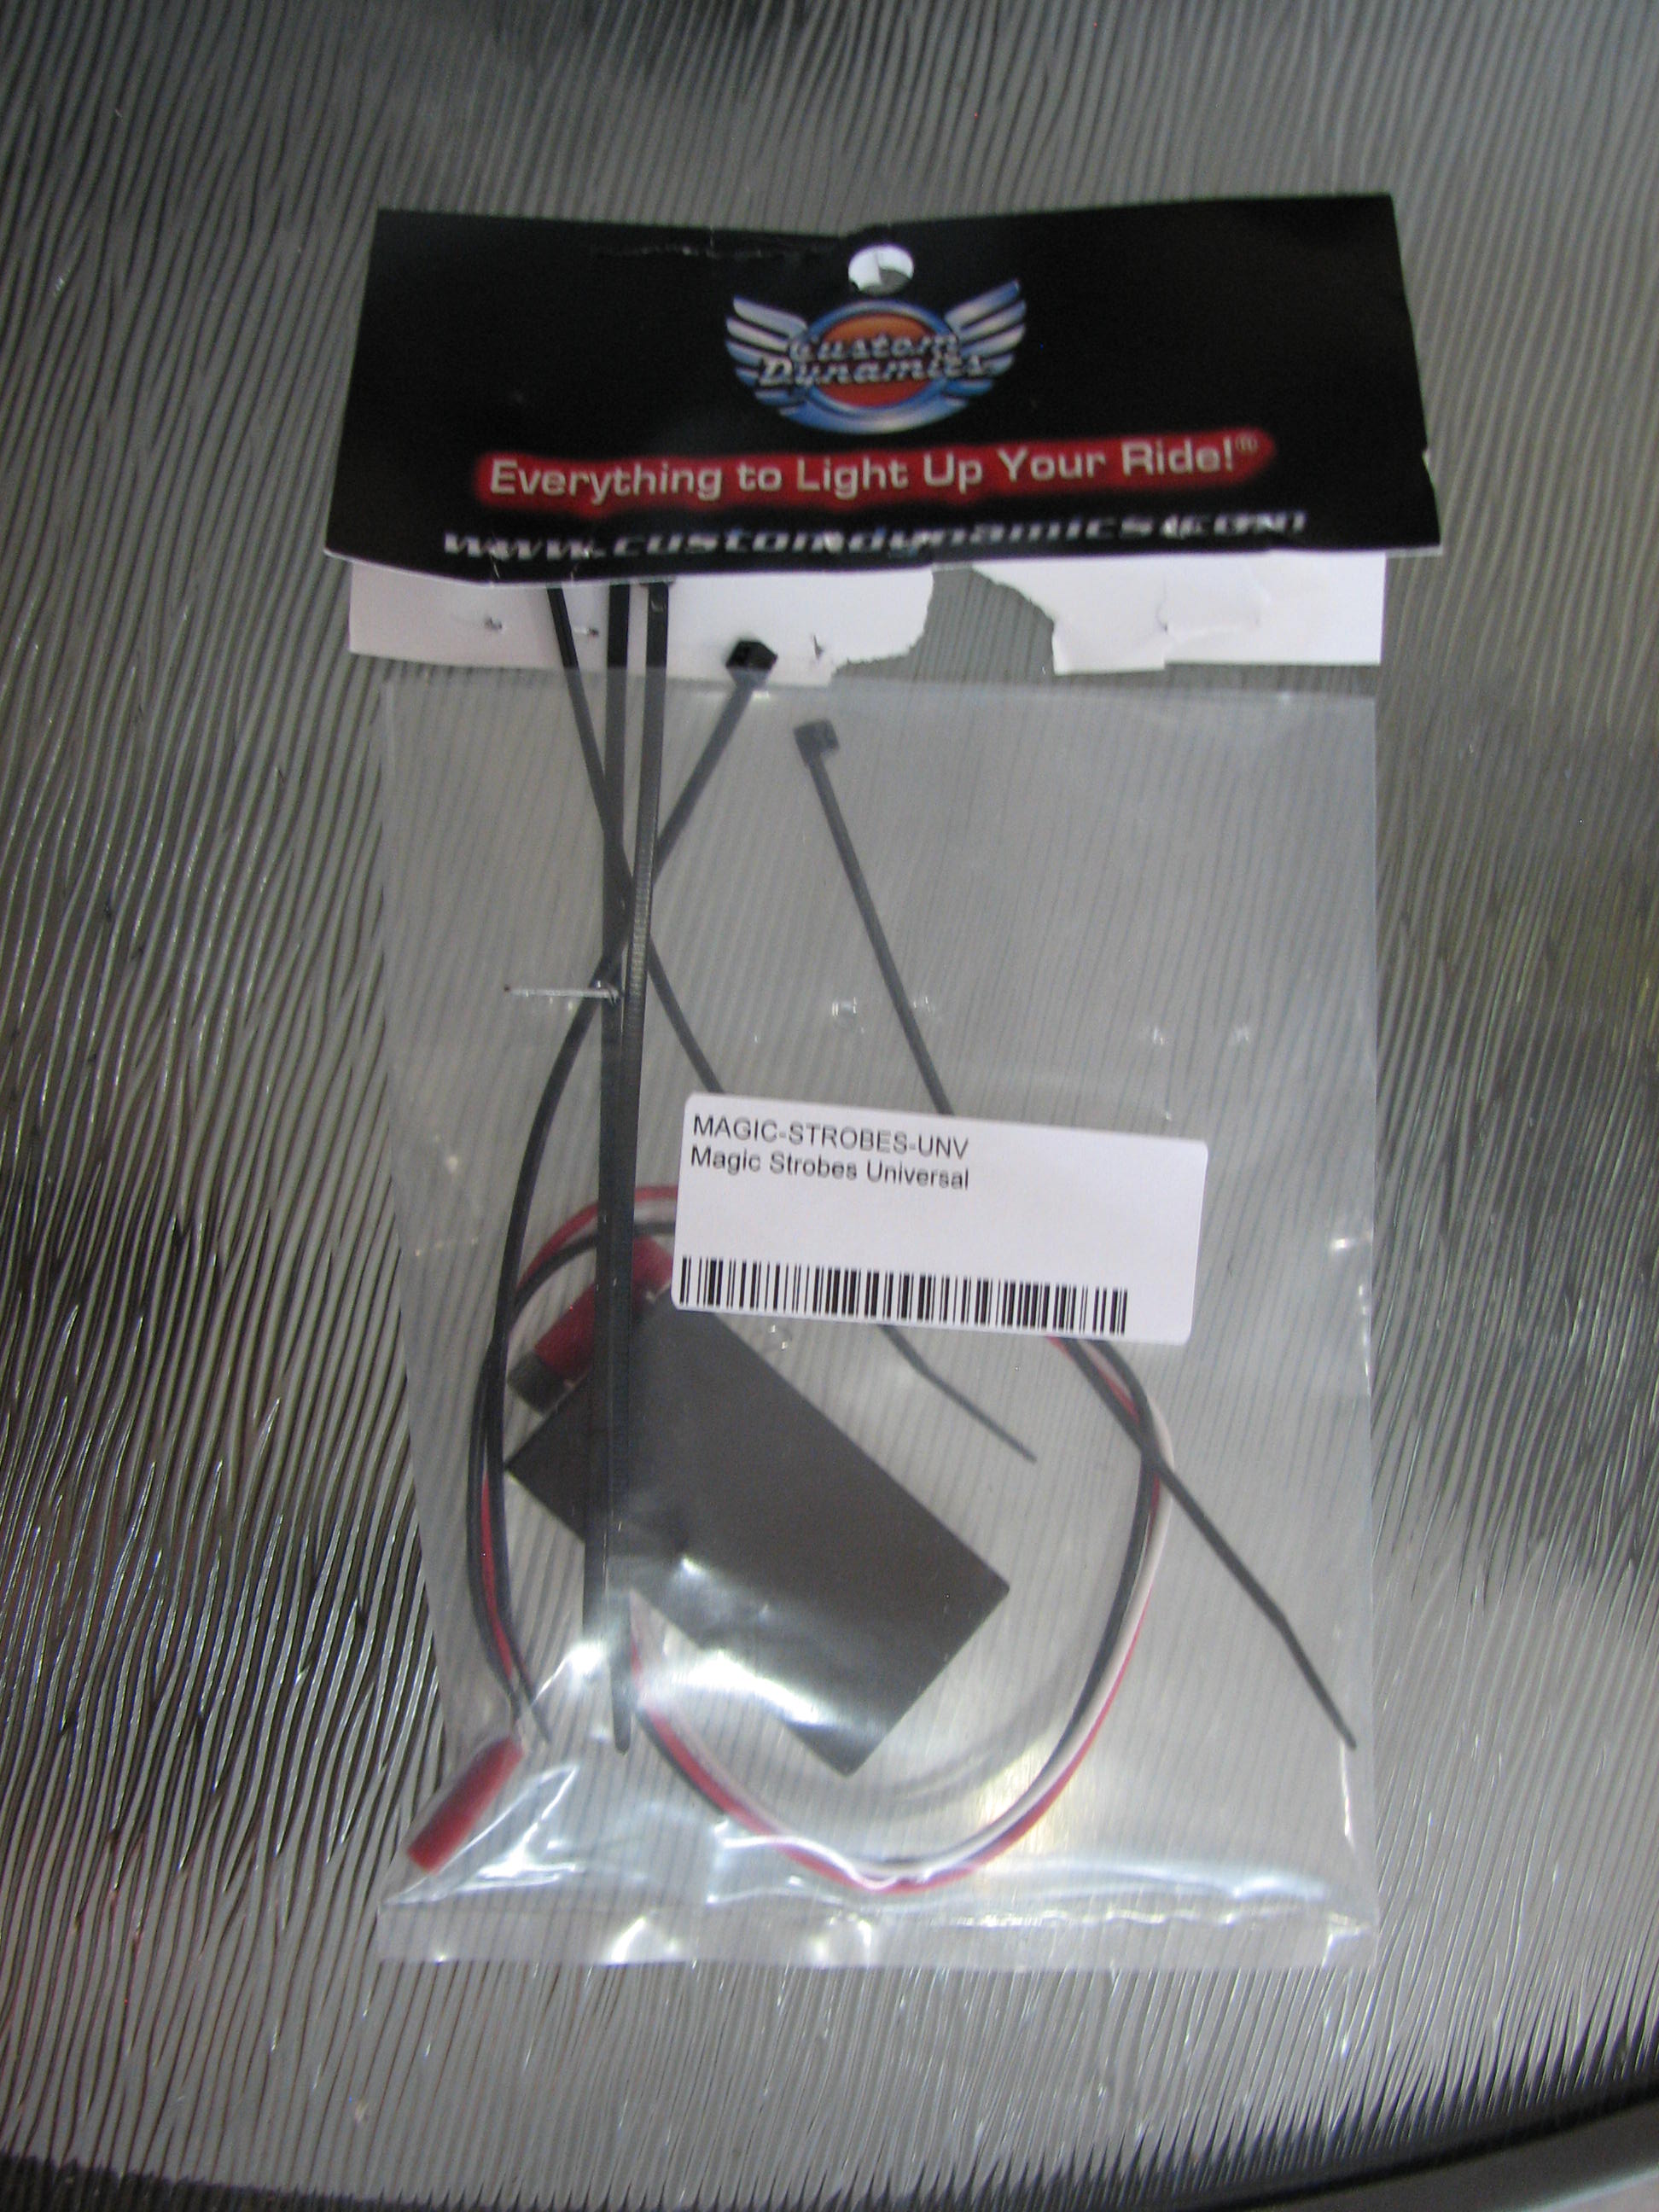
Adding a CustomLED Magic Strobes Brake Light Flasher
to the Topcase of a Victory Cross Country Motorcycle
This document describes how to add a CustomLED Magic Strobes Brake Light Flasher to the array of LEDs on the topcase of a Victory Cross Country ("XC") motorcycle. The Cross Country Tour ("XCT") version, which is the 2012 model I have, of the Cross Country comes with a topcase; if you have a base Cross Country or some new similar models from Victory, the topcase is available as an option. The Flasher module is also available from Custom Dynamics (which has some close working relationship with CustomLED).
Update, January 2024:
In the ten years since I first published this page, the price has gone up a bit. The cost is now $69.95 at CustomLED, but $59.95 (plus tax, but with free shipping) at Custom Dynamics. So order this at the latter site; the products are identical, as you can determine by downloading the installation PDF files at either page.
As with all the pictures on this page, click on the image to enlarge it, and then press Escape or Enter or the "X" (which appears if you hover your mouse over it) to close the enlargement:
WHY A FLASHER?
The Victory "Cross" bikes come with LED turn signals and brake light(s). These are bright, and the reflectors inside of the frenched brake-light LED arrays in the fender and topcase nicely direct the light rearward.
Does anyone doubt, however, that the number of inattentive (some might say "brain dead") drivers continues to increase, especially those drivers texting, eating, putting on makeup, and so forth? Not surprisingly then, in some of the U.S. states with large motorcycle populations, being struck from behind accounts for about 4% of all motorcyclist fatalities! So, as good as the brake lights are on the Victory (or any other bike), it seems like it's in your best interest to add some "pop" to your braking.
WHAT ARE YOUR CHOICES?
You can "flash" your brake lights yourself — for instance, if you're at a stoplight, and a car is approaching more quickly than you think appropriate — simply by releasing and reapplying the brakes. Bikers have been doing this for years. However, if you want an electronic substitute for this practice, there is no shortage of add-on brake lights and flashers.
These come in two varieties: actual additional lights, and modules that alter the behavior of your current lights. In the first category:
- Perhaps the most well-known (and well-regarded) are Hyper-Lites. These are add-on LED pods, and come in a variety of configurations of running, brake, and turn-signal lights, in clusters of eight or sixteen LEDs. The Hyper-Lites offer a few different flash-pattern modes.
- Another solution are Skene's P3 Lights. The P3 Lights have even more sophisticated electronics, providing a large assortment of flash modes and patterns. These add-ons are highly touted in some BMW forums, which is nothing to sneeze at, as Beemer riders (particularly GS owners) are probably the most farkle-prone riders extant.
Update, January 2024:
On a new '22 BMW C 400 GT scooter, I did in fact choose to put Skene's additional P3 brake-flashing (and turn-signal) lighting out back. This is a bike that, unlike the XCT, did not have any topcase lighting, and in my opinion did not have sufficient lighting out back in general. In any case, for those of you keeping score at home, note that I am very pleased with the Skene product.
In the second, control-module-only, category:
- A popular product is Signal Dynamics' BackOFF. The BackOFF comes in several varieties, some of which offer a couple of different flash patterns.
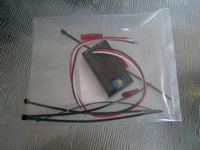
- As cited at the start of this page, the one I chose is CustomLED's Magic Strobes Brake Light Flasher.
There are of course other manufacturers of both types of products. Finding and evaluating them is left as an exercise for the reader.
WHY THE MAGIC STROBES?
There are several reasons why I chose the CustomLED Magic Strobes product instead of one of the others:
- The XCT already has bright LEDs. That is, if your bike has incandescent brake lights, I would recommend that you add one of the LED products; LEDs are almost always brighter, have no start-up delay, and are generally more attention-getting. However, in my case, I felt that getting a module to modify the behavior of the existing LEDs was sufficient.
- The Magic Strobes has a whopping ten different flash modes. Further, some of these modes are for LED lights only, i.e., they flash too rapidly to be used with incandescent bulbs, which — if you have LEDs, and are trying to be noticed when stopped or braking — is in my opinion a good capability.
- The electrical hookup (see below) is very easy.
- Changing flash modes is accomplished simply by turning a dial. With some units, changing modes requires connecting different sets of wires.
- It is cruise-control compatible. If you're not familiar with this concern, it may seem strange to even mention cruise controls. It turns out that the Victory's electronic control module (ECM) monitors the brake wiring (I'm not sure whether it's watching voltage, current, or resistance), not merely checking to see whether a brake-activated switch has just been closed... which, of course, would deactivate the cruise control. What this means, in terms of our discussion here, is that if you connect certain electronics to a brake circuit, the ECM may decide not to let you activate the cruise control (whether because it thinks there is some fault in the circuit, or because it thinks you've already activated a brake, I don't know).
Thus, some devices, including the Magic Strobes, when installed on some bikes, require that a load equalizer or some other device also be added in an appropriate manner to the bike. Happily, such a problem is not the case with the Magic Strobes on an XCT... at least when using just the trunk LEDs. It appears, however, from reading forum posts, that you do have to use an equalizer if you connect the Magic Strobes to the fender LEDs on a "Cross" bike.
Updates, June 5, 2014:
First, a week or so ago, in an email exchange with Paul (no last name given) of Custom Dynamics, he wrote:
The load equalizer is only required for turn signal function. Most of the newer Victory bikes have a canbus system on the [sic] that doesn't require use of the load equalizer to correct rapid flash on the turn indicators. The first issue magic strobes where [sic] cutting off the cruise control but that problem has been fixed internally in the strobes unit.
The implication, I believe, is that if you've just ordered a Magic Strobes flasher and you want to use it only on the fender LED, you should not have a problem with the cruise control's not working, according to Paul.
Second, I was speaking with Brandon (no last name given) of Victory's home office at the Victory demo area at Americade this week. He's an engineer or a well-versed technician or something along those lines. I told Brandon about my Magic Strobes topcase installation, and he asserted that even if it works fine now, at some point the control unit on the bike may decide that it doesn't like seeing a non-stock situation and — I'm not making this up — decide to self-destruct.
With both the email from Paul and the conversation with Brandon, I'm just reporting what was communicated, i.e., not vouching for the correctness of any of it. I suppose I should emphasize here, use any of these products at your own risk (although I'm not losing any sleep over my installation).
- At
$45 $60 (plus tax and shipping), the Magic Strobes unit may be the least expensive flasher module. If it isn't, it's still certainly a bargain.
INSTALLATION:
In the case of the XCT, you have to decide whether you want to flash the LEDs in the topcase or in the fender, as both of these act as brake (and running) lights. Hooking up some device to control both sets of lights would be a very complicated process, because there is not a single set of wires that controls both brakes. The bike has a normal wiring harness, the topcase has its own dedicated wiring harness, and never the twain shall meet (except, I suppose, at the ECM).
I chose to alter the topcase light. That light is more at eye level for a following driver, getting at the stock topcase wiring in order to connect the new wires is pretty easy, and this allows the module — with its built-in mode-selection switch — to be conveniently placed in the topcase itself. Further, if I decide to remove the topcase (and it is built to be easily removed, if you're not familiar with it), all of these wiring changes will be removed along with it; that is, the remainder of the bike will be completely stock in this regard.
And here's how I did that:
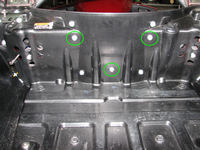
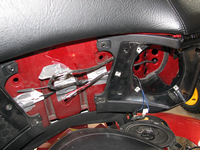
- Remove the passenger backrest pad. There are three (6mm Allen-head) bolts that need to come out:
(By the way, if you were considering doing the wiring for this modification at the point where the stock wires enter into the actual LED array at the tip of the trunk lid, don't even think about it!. That piece is one assembly, including the stock wiring's brake/running-light wire bundle. That is, there are no user-serviceable connnectors back there, nothing to see, move along:

And as a final act of effrontery, the three bolts you would have removed to get at that assembly have no taper whatsoever at the end of their threads, making their alignment and reinsertion a real pain.)
Now, where was I? Oh, yeah, back to the passenger backrest area.
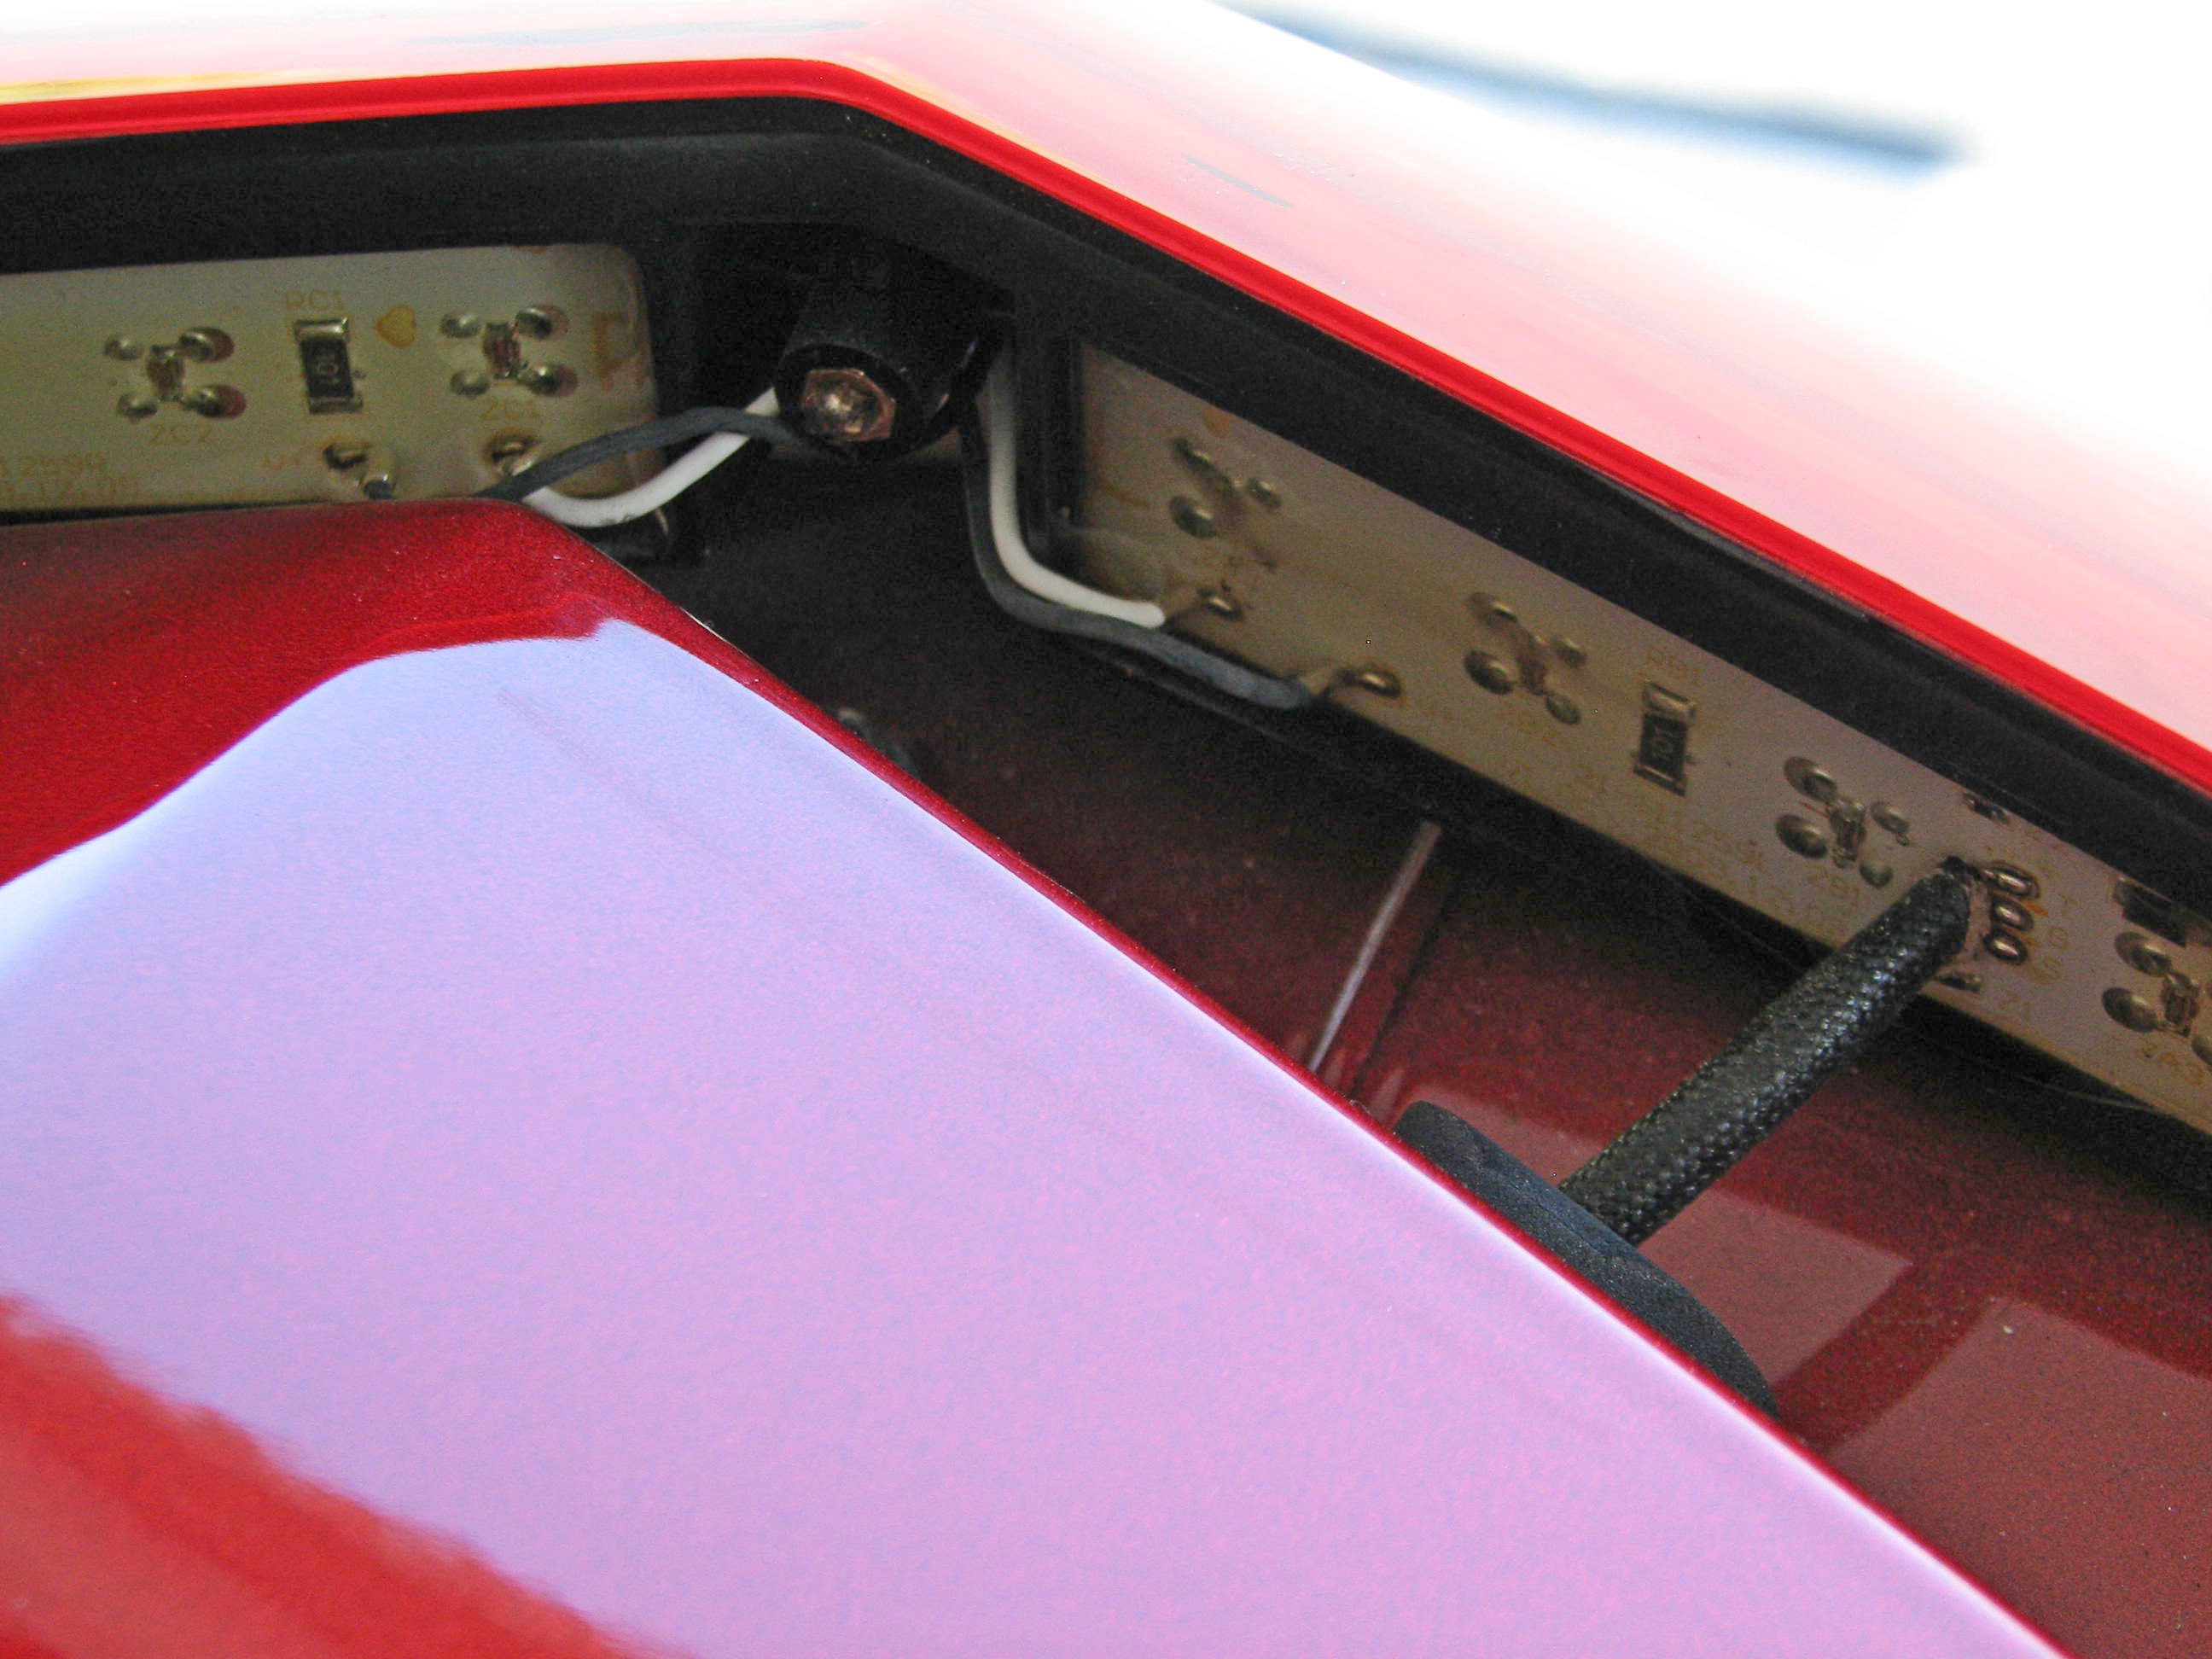
- Lift off one end of the duct tape. Yes, surprisingly, this is the way that some slack in the trunk-light wire is held in place by the factory:
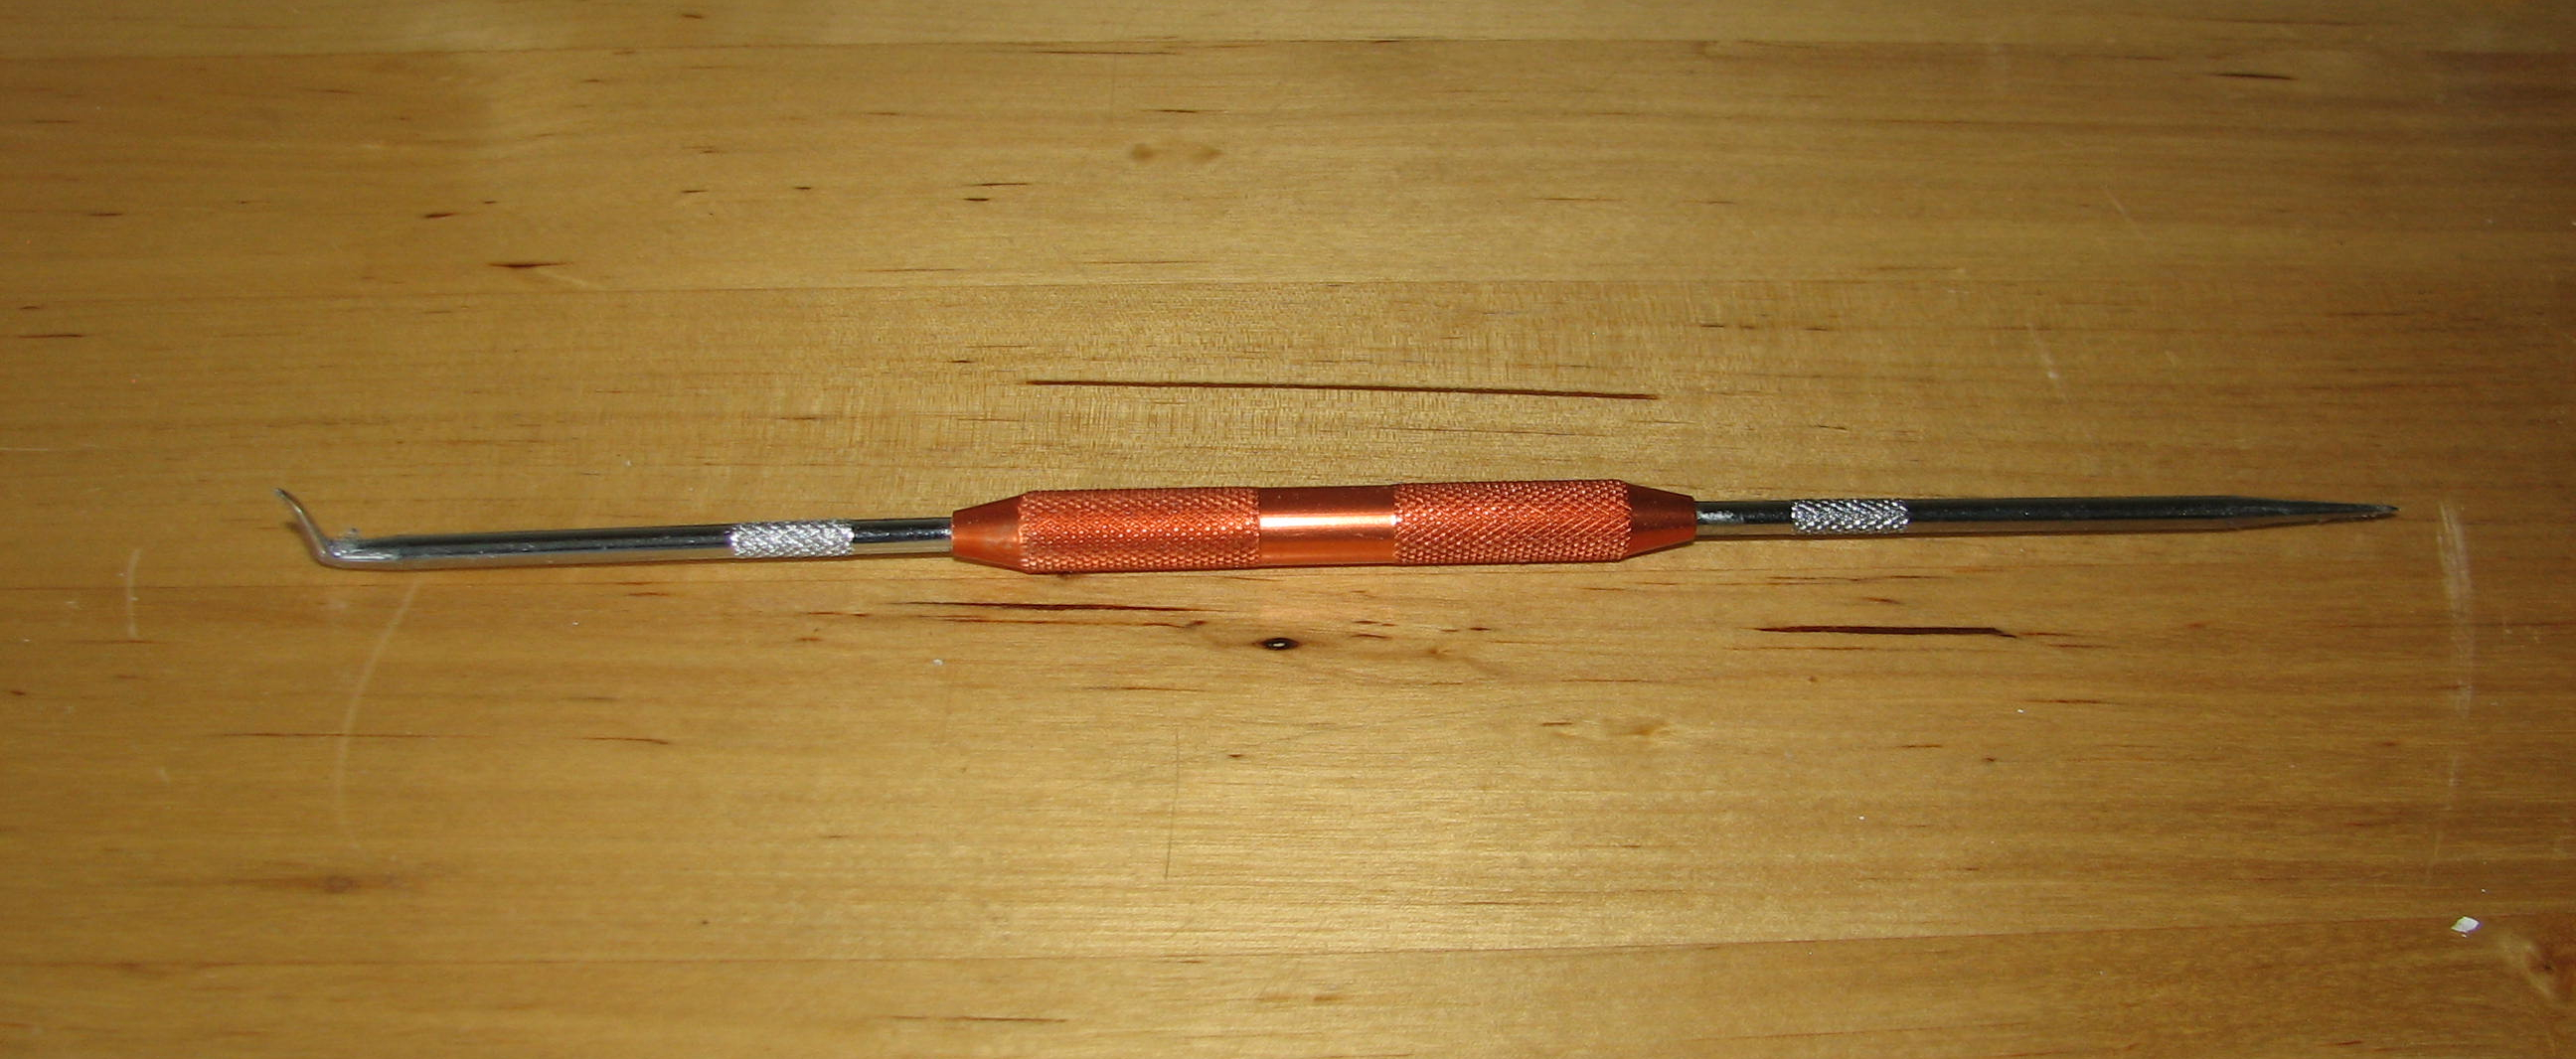
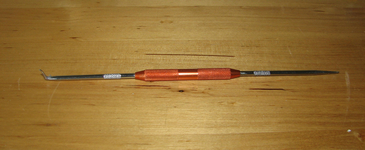
- Remove some of the sheathing in the middle of this run. I used an O-ring hook from Harbor Freight that I had in my toolbox, using the right-angle end to very carefully pierce and then pull back the outer sheath (and then used scissors to carefully cut back and remove some more of it):
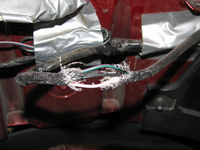
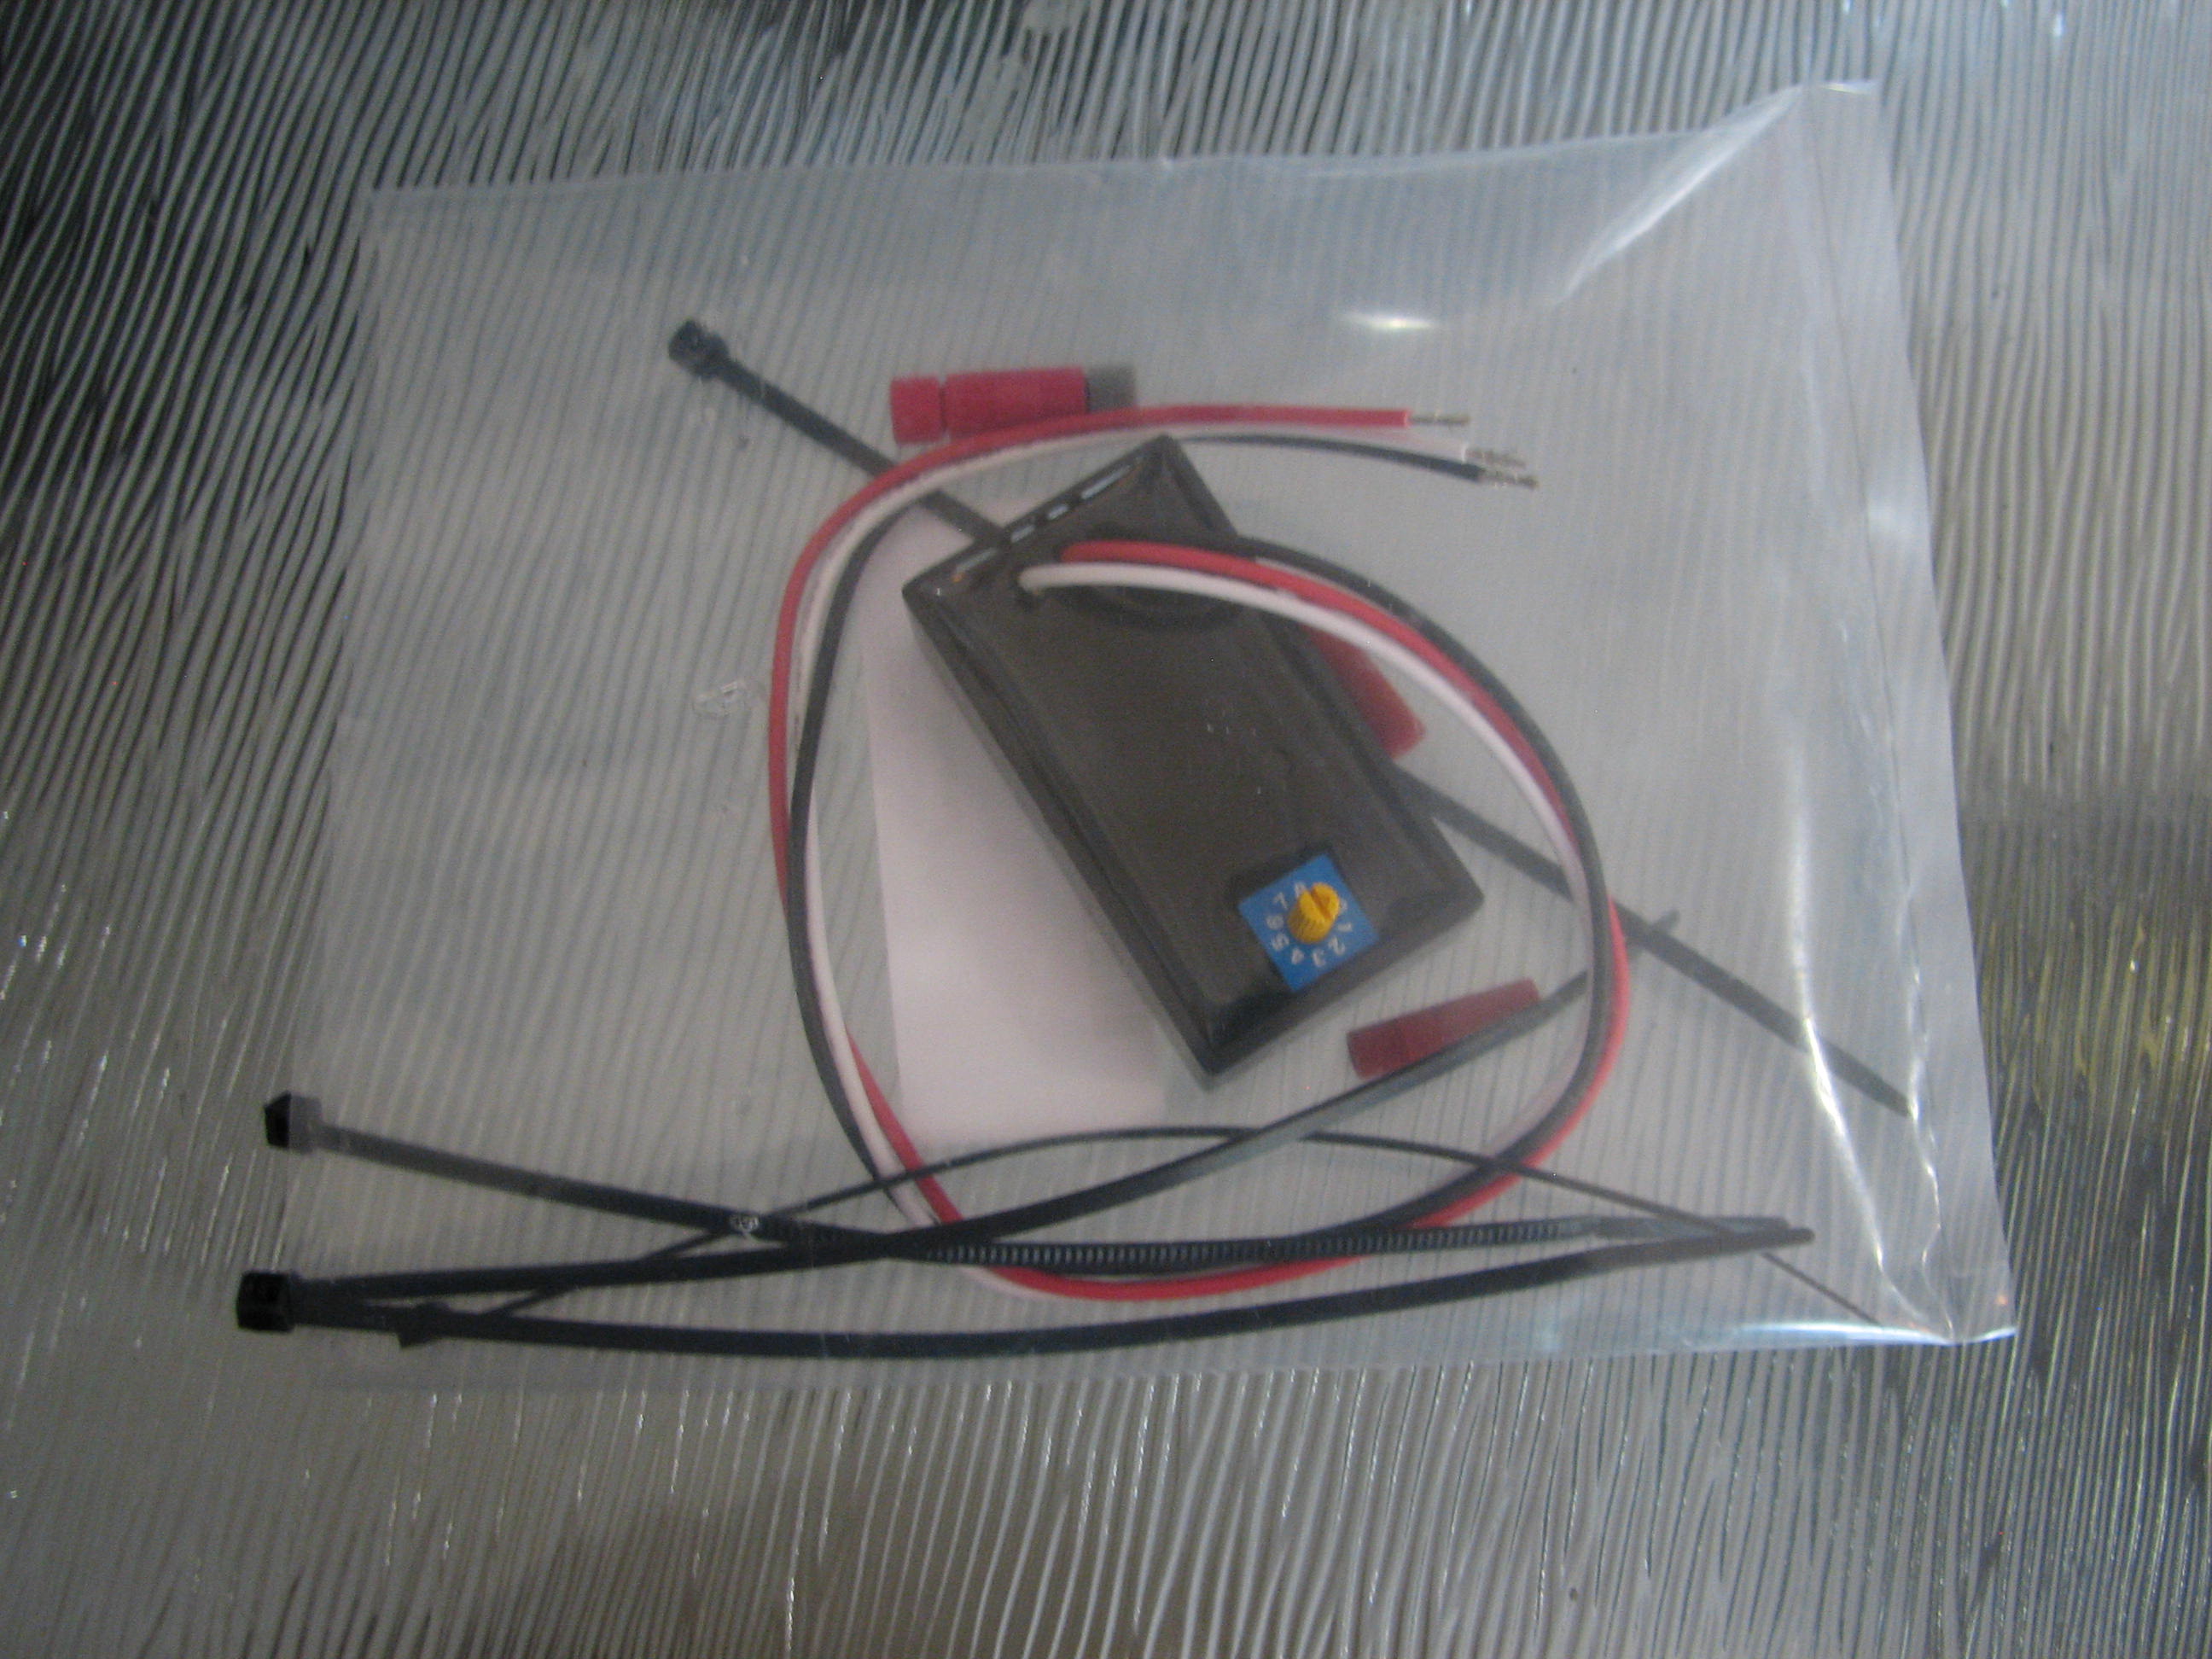
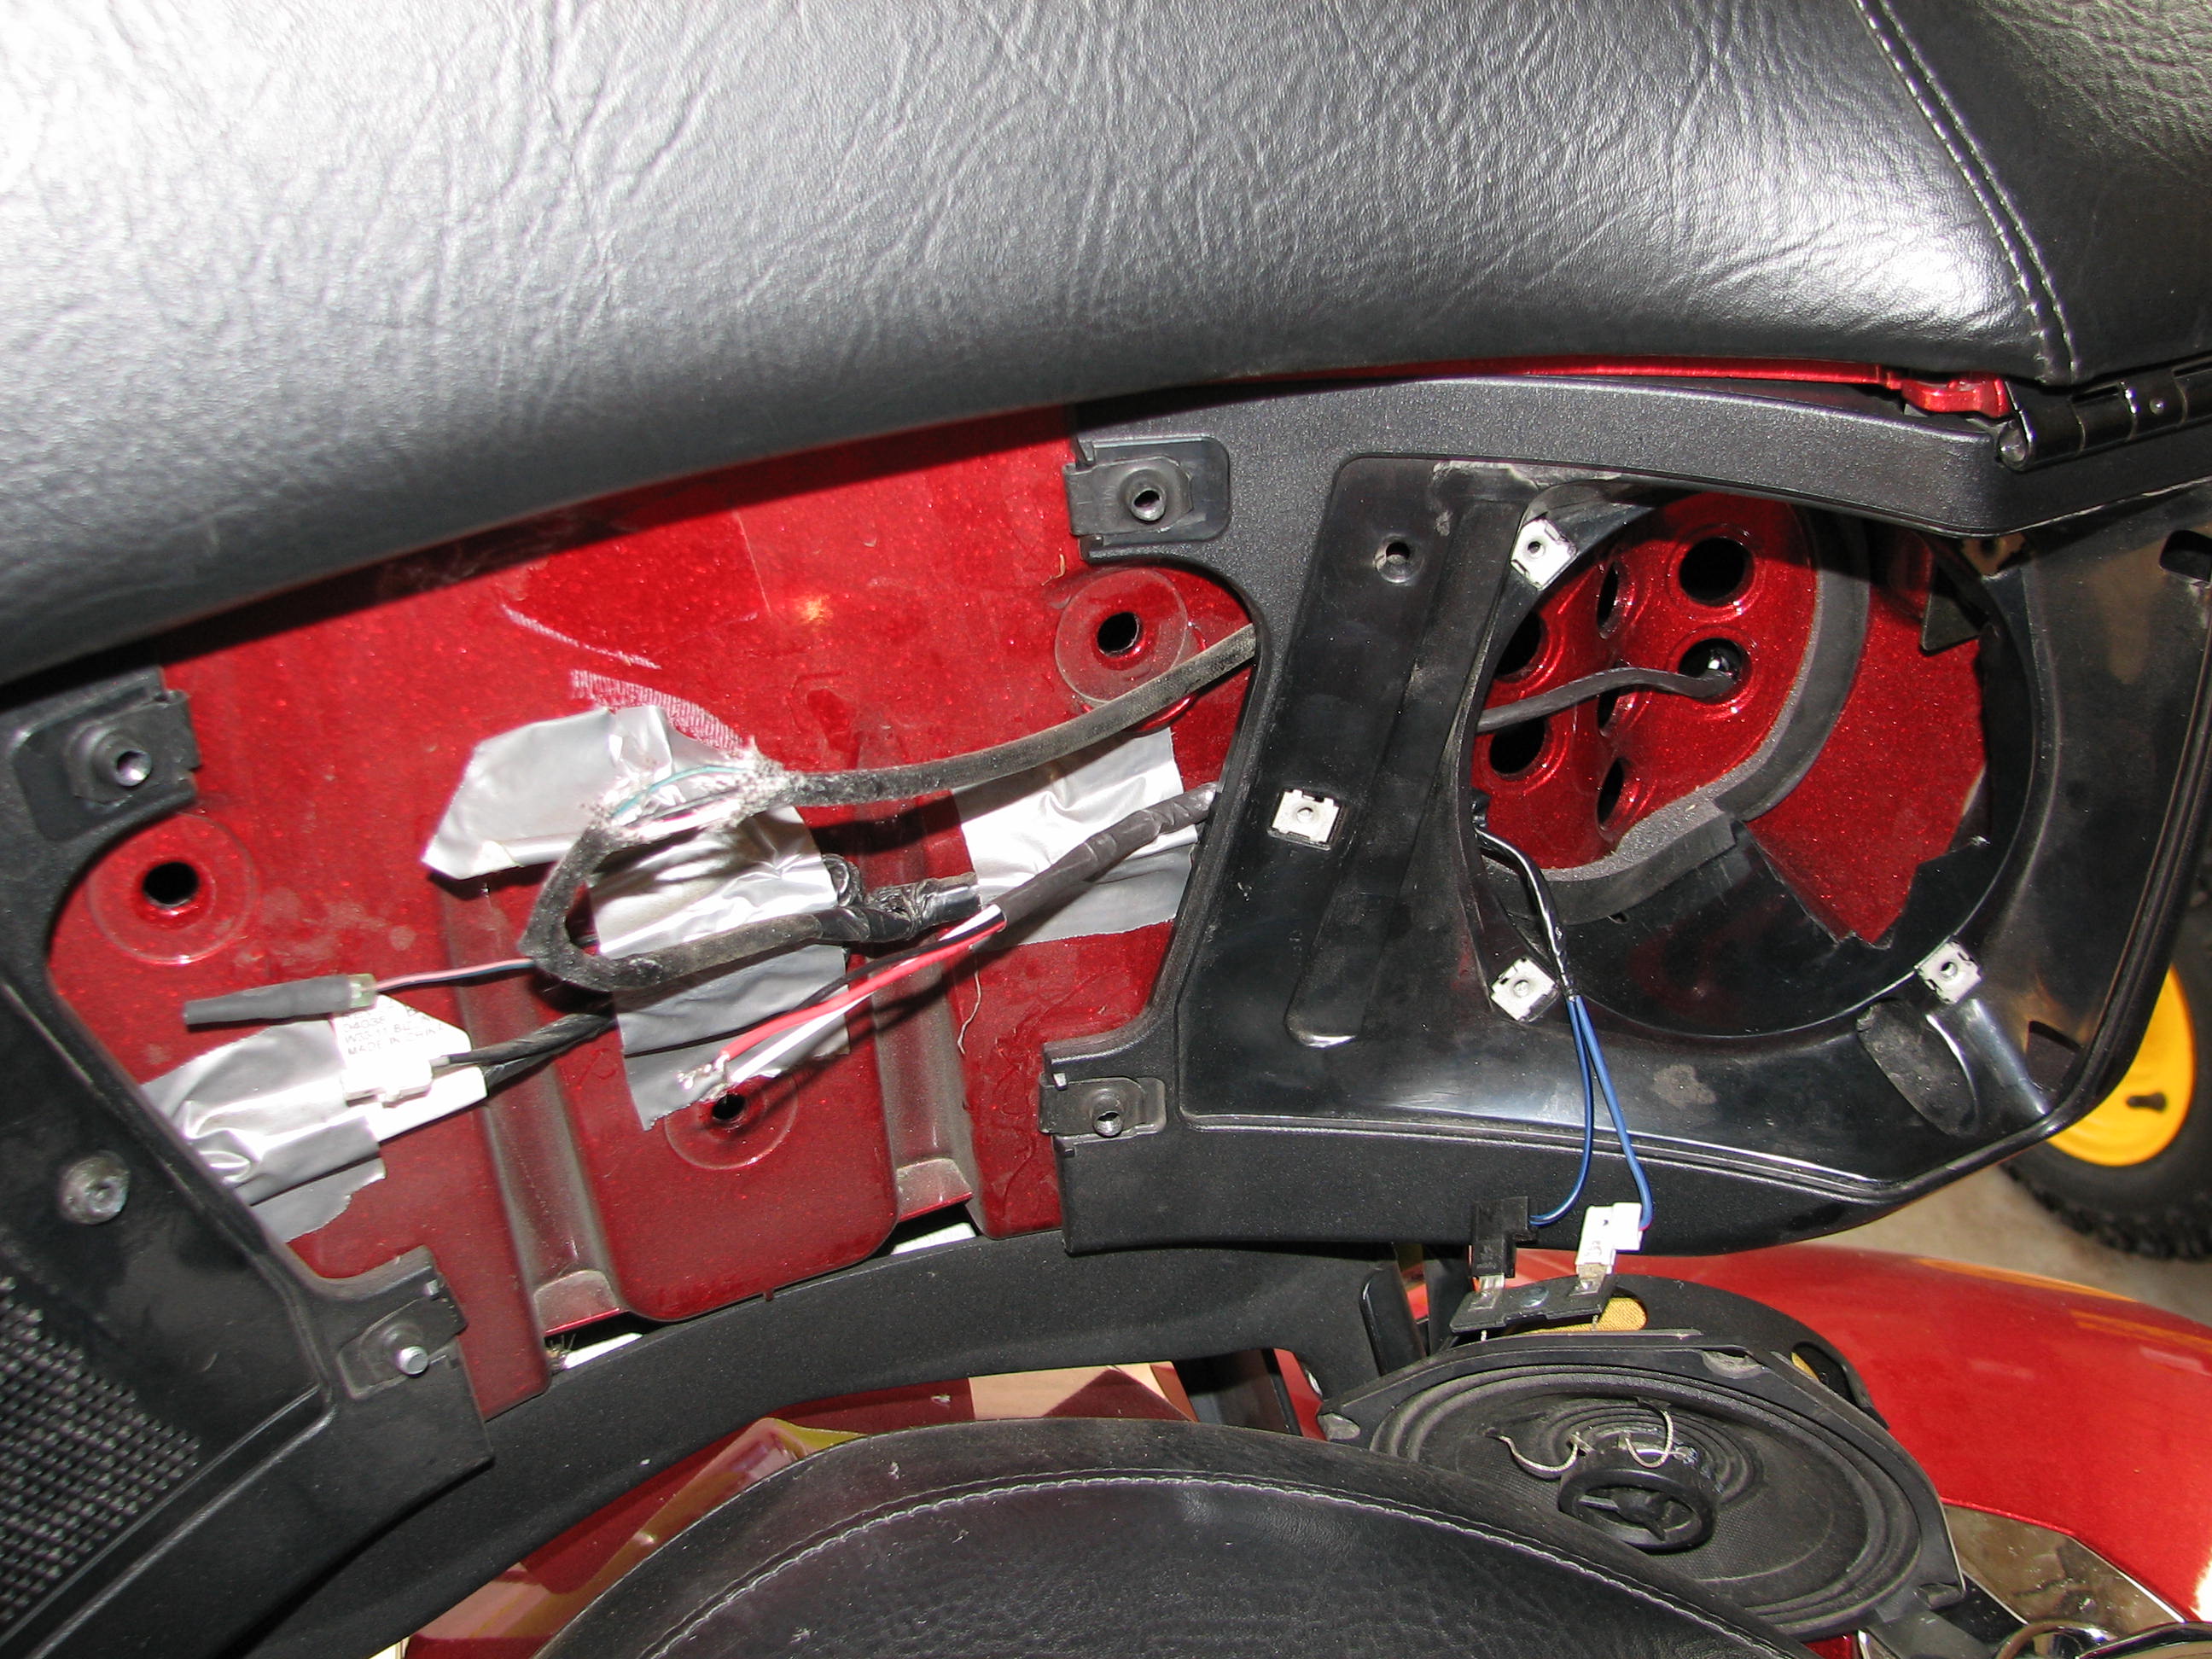
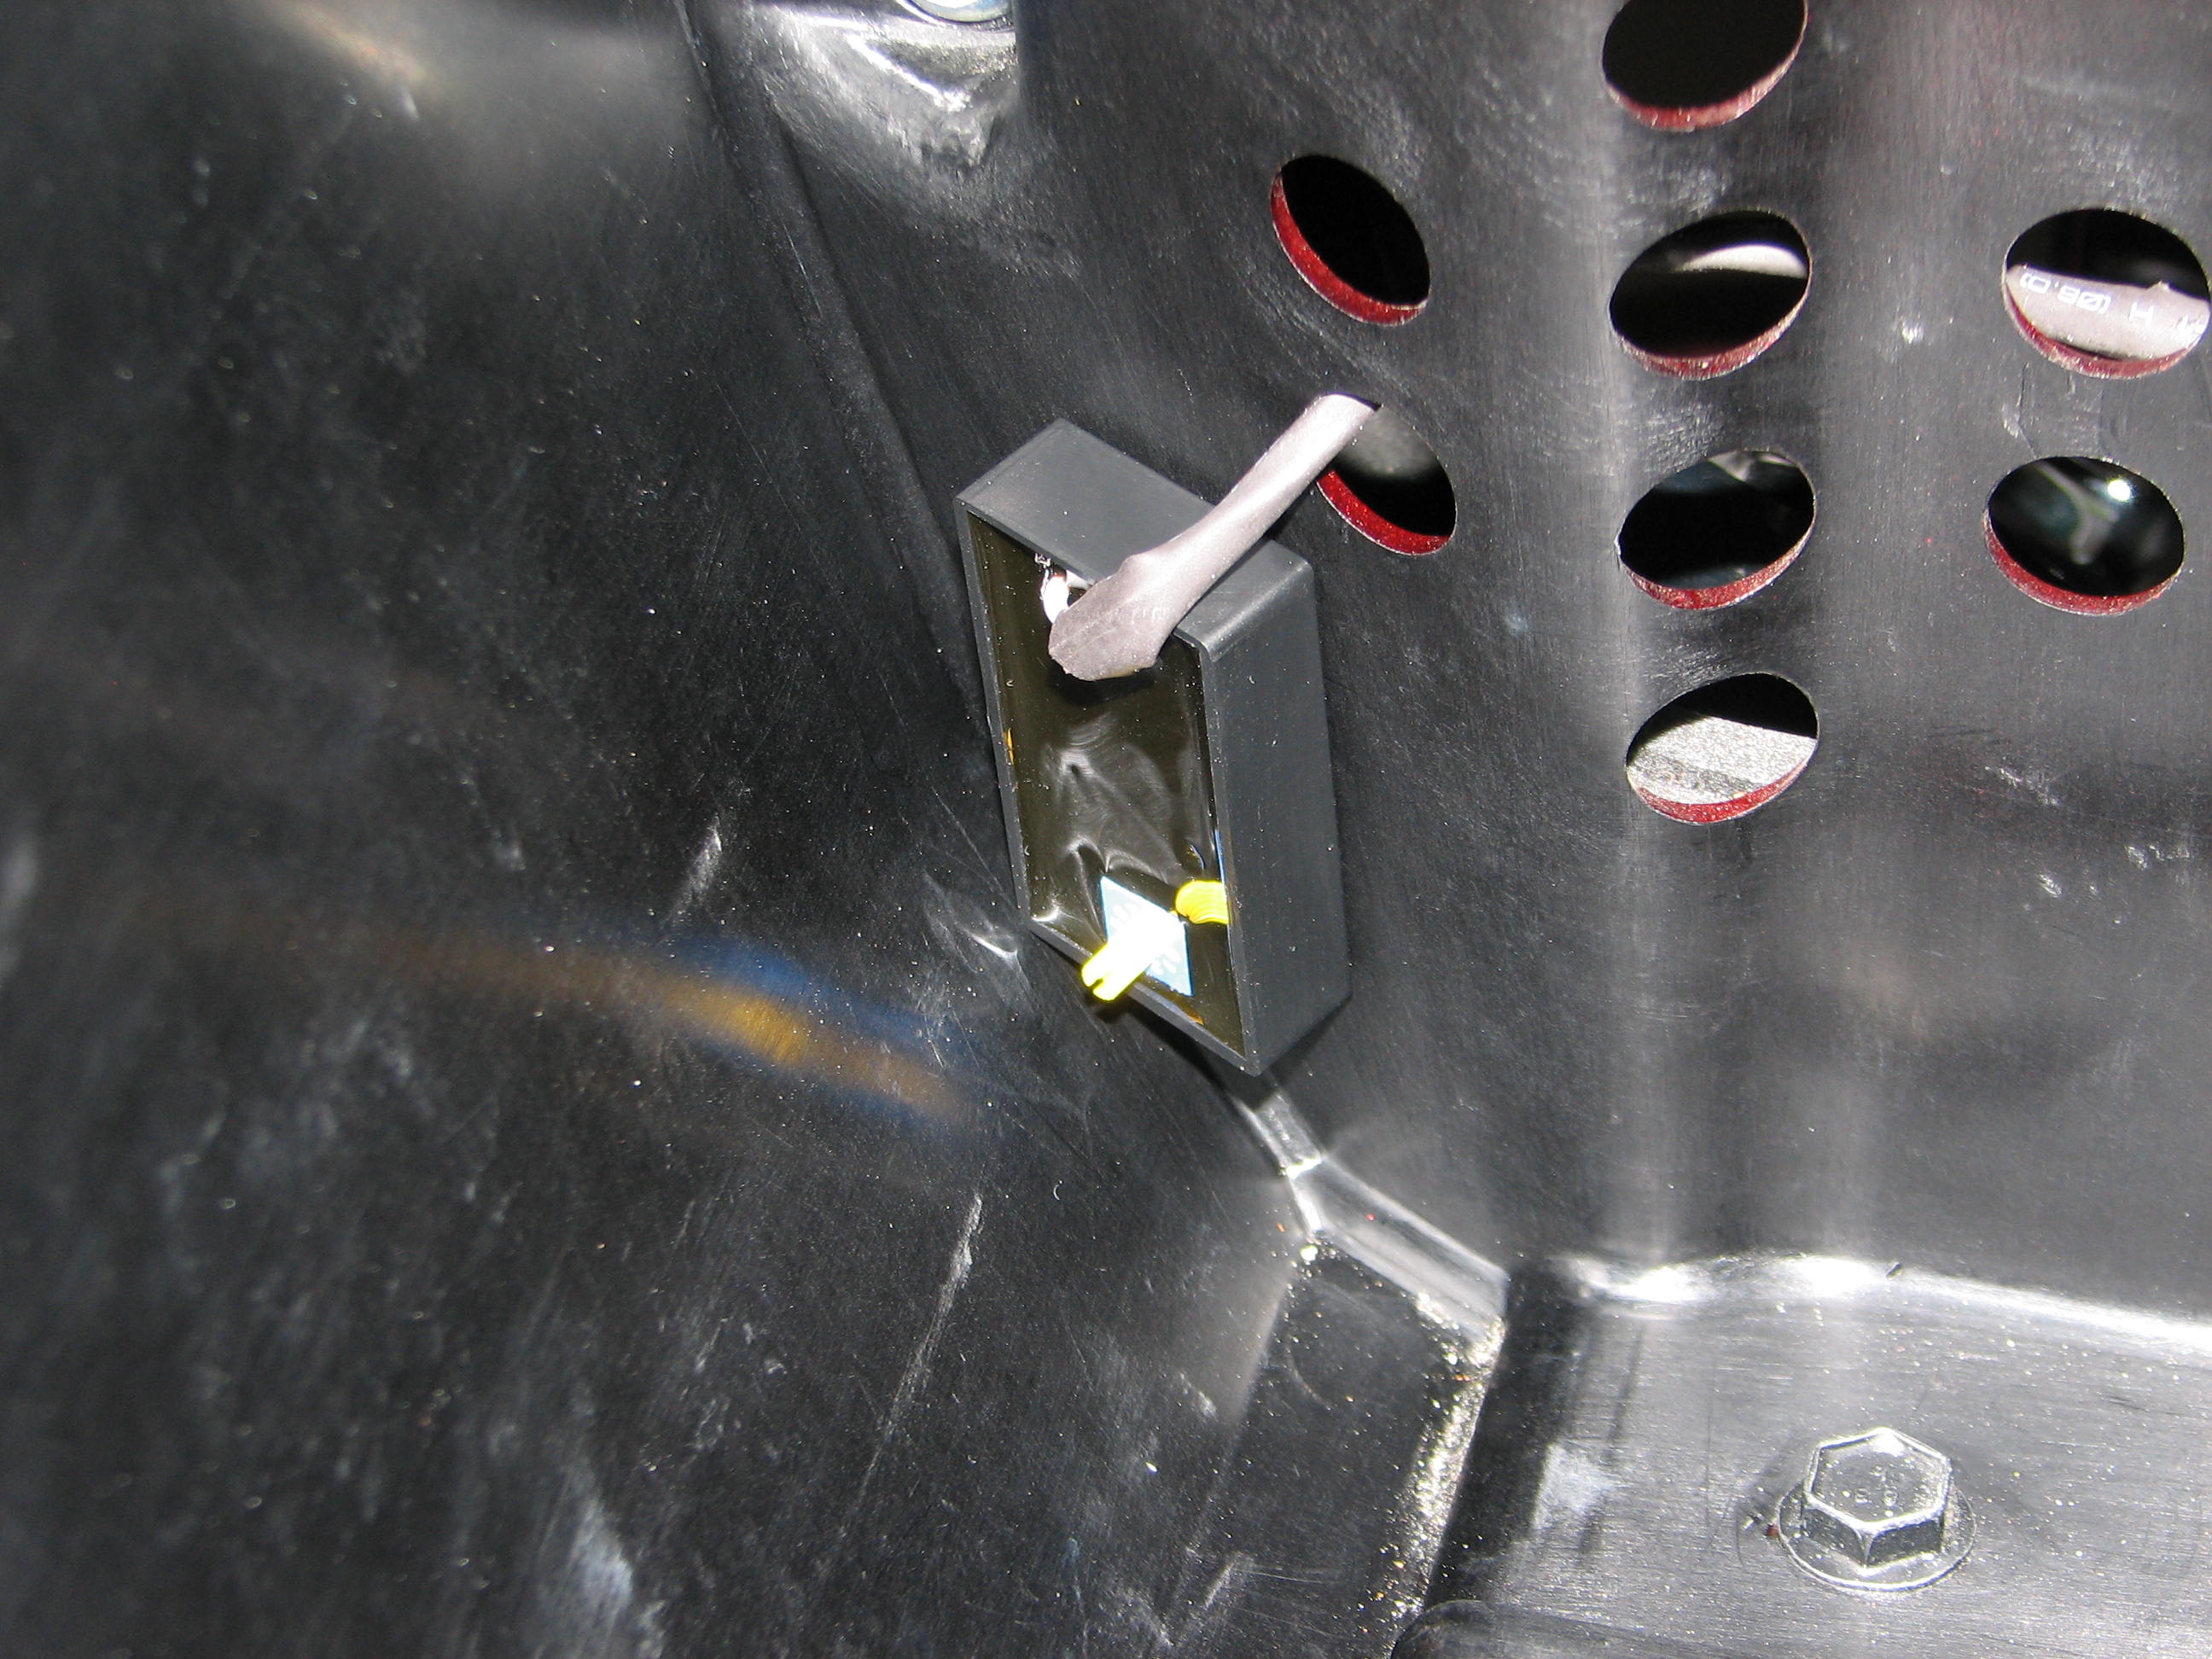
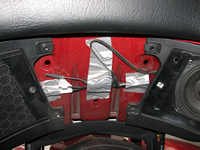
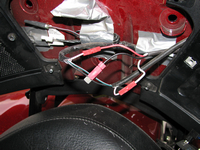
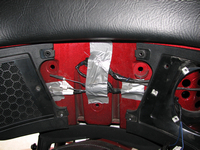
- Remove a speaker, place the Magic Strobes in the topcase, and run the wires from the unit through a baffle hole and around to the opened-sheath area. The speaker grill is held in place by a single (4mm Allen-head) screw, and then can be pried out from the center. The speaker is held in place by four screws (T20 Torx, although a 3mm Allen wrench will do in a pinch). There's some foam behind the speaker enclosure that you'll need to push out of the way; you can also remove two more bolts from inside the topcase, for more free play of the speaker enclosure. Notice that I have first enclosed the three wires from the Magic Strobes in some heat-shrink tubing (pointing the heat gun away from the unit):
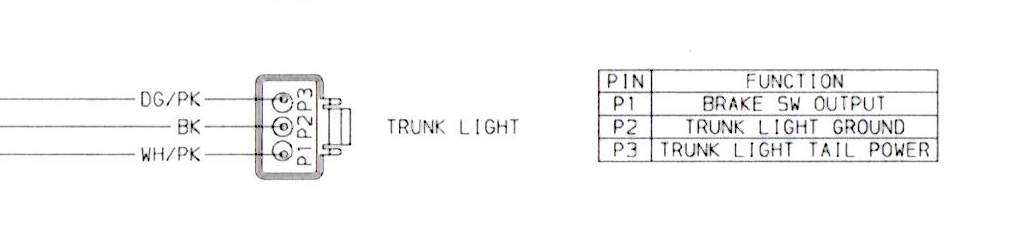
- Cut through only the white wire with pink trim. This is the stock brake wire; the green wire with pink trim is the running-light wire, and the black is the ground. If you're really curious, I've scanned in the trunk wiring page from the shop manual, but this is the relevant corner of that page:
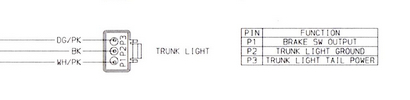
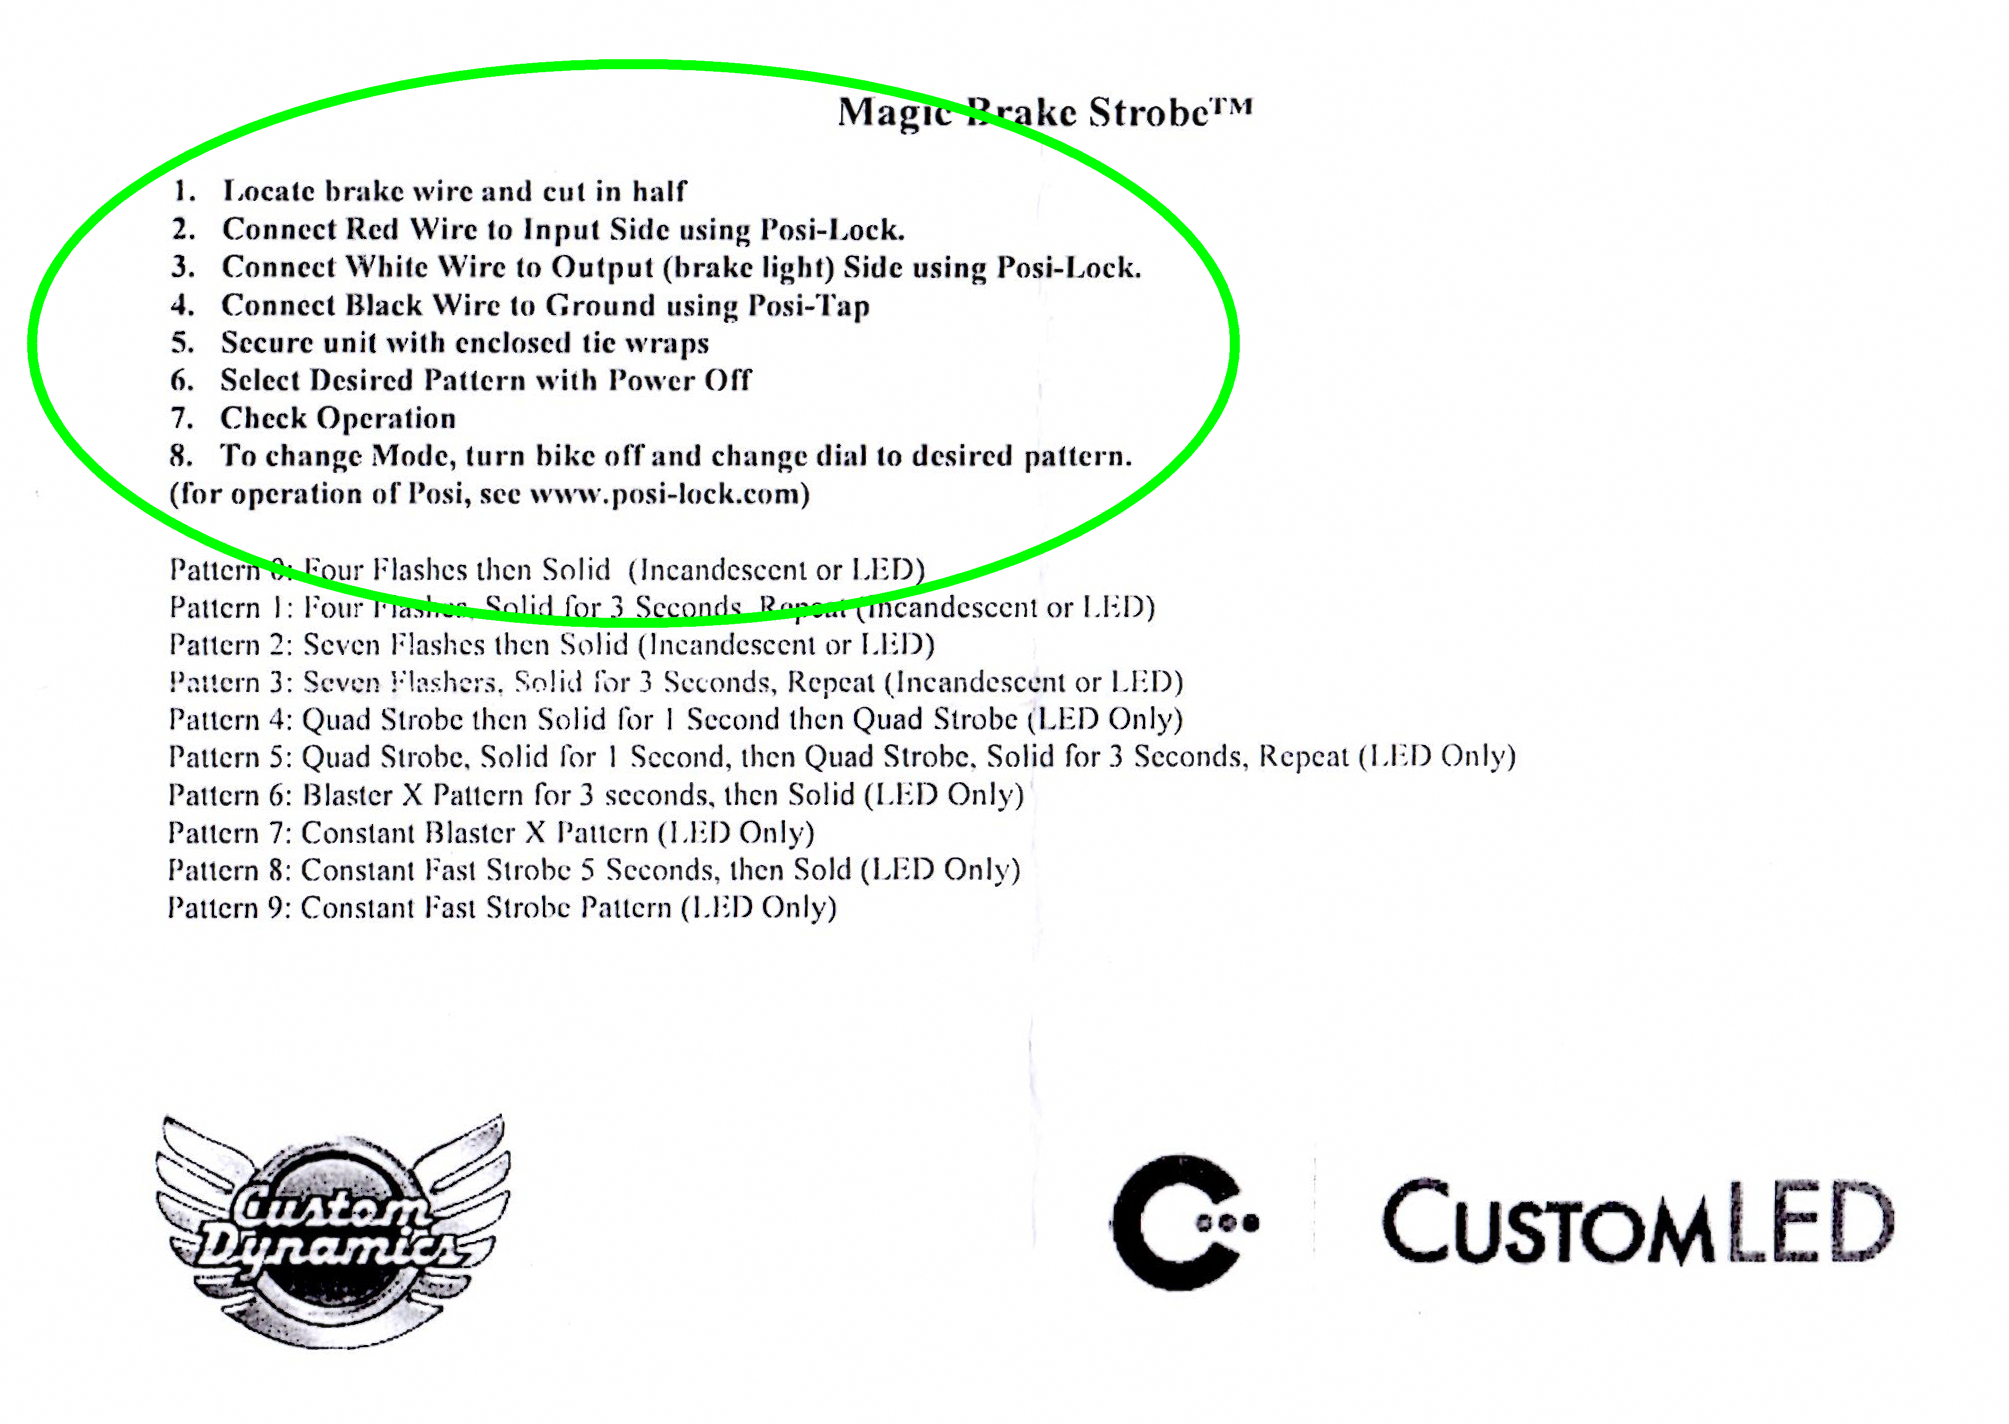
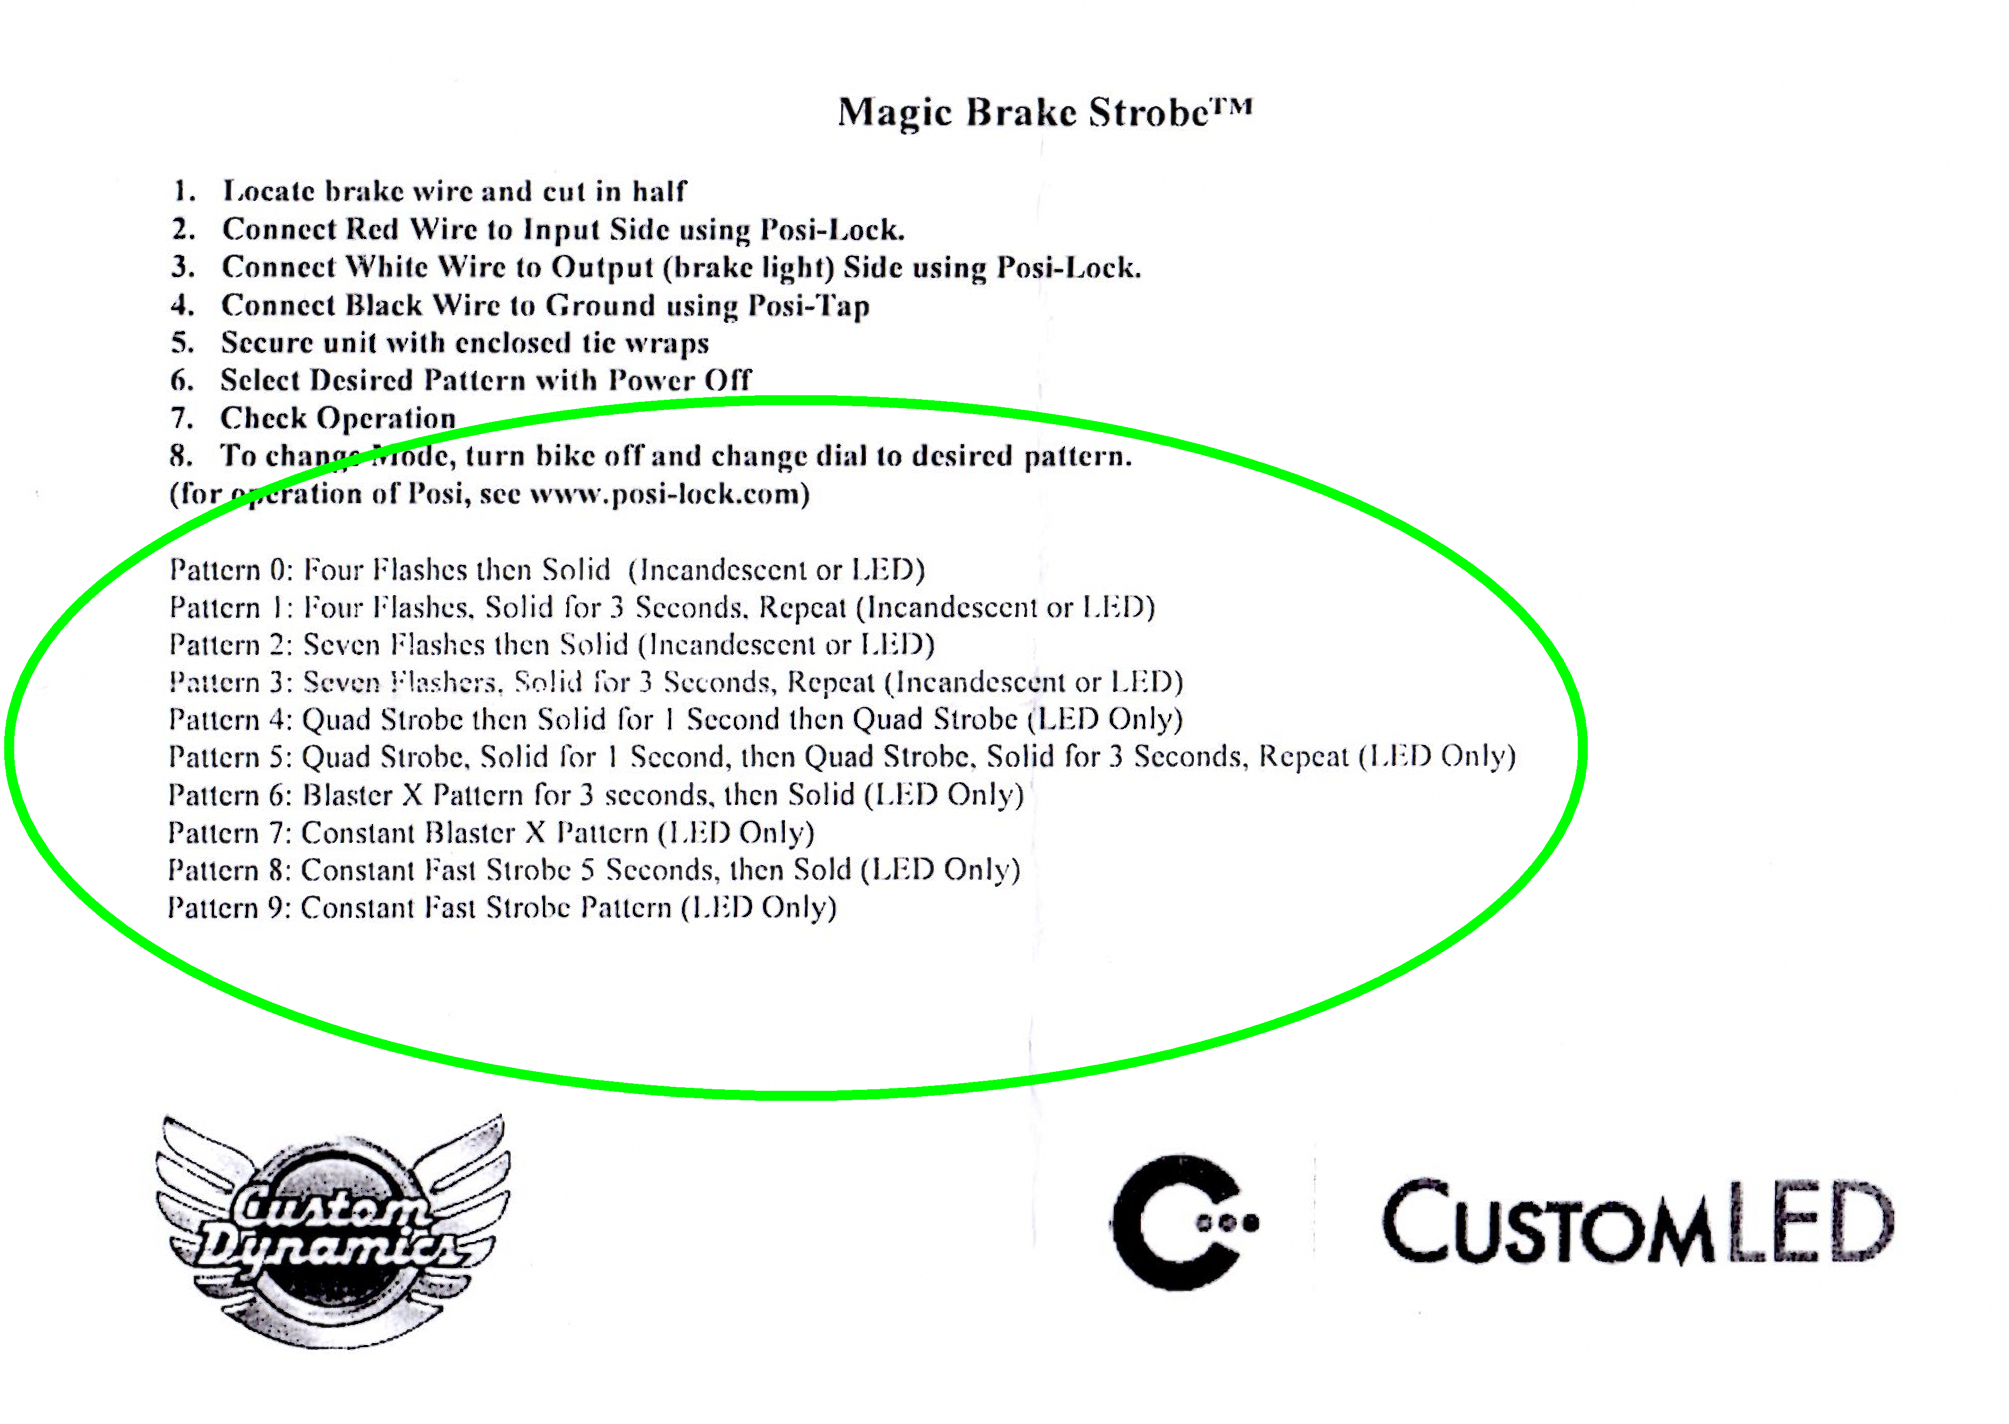
- Connect the Magic Strobes wiring to the bike. Here are the wiring instructions that came with the unit:
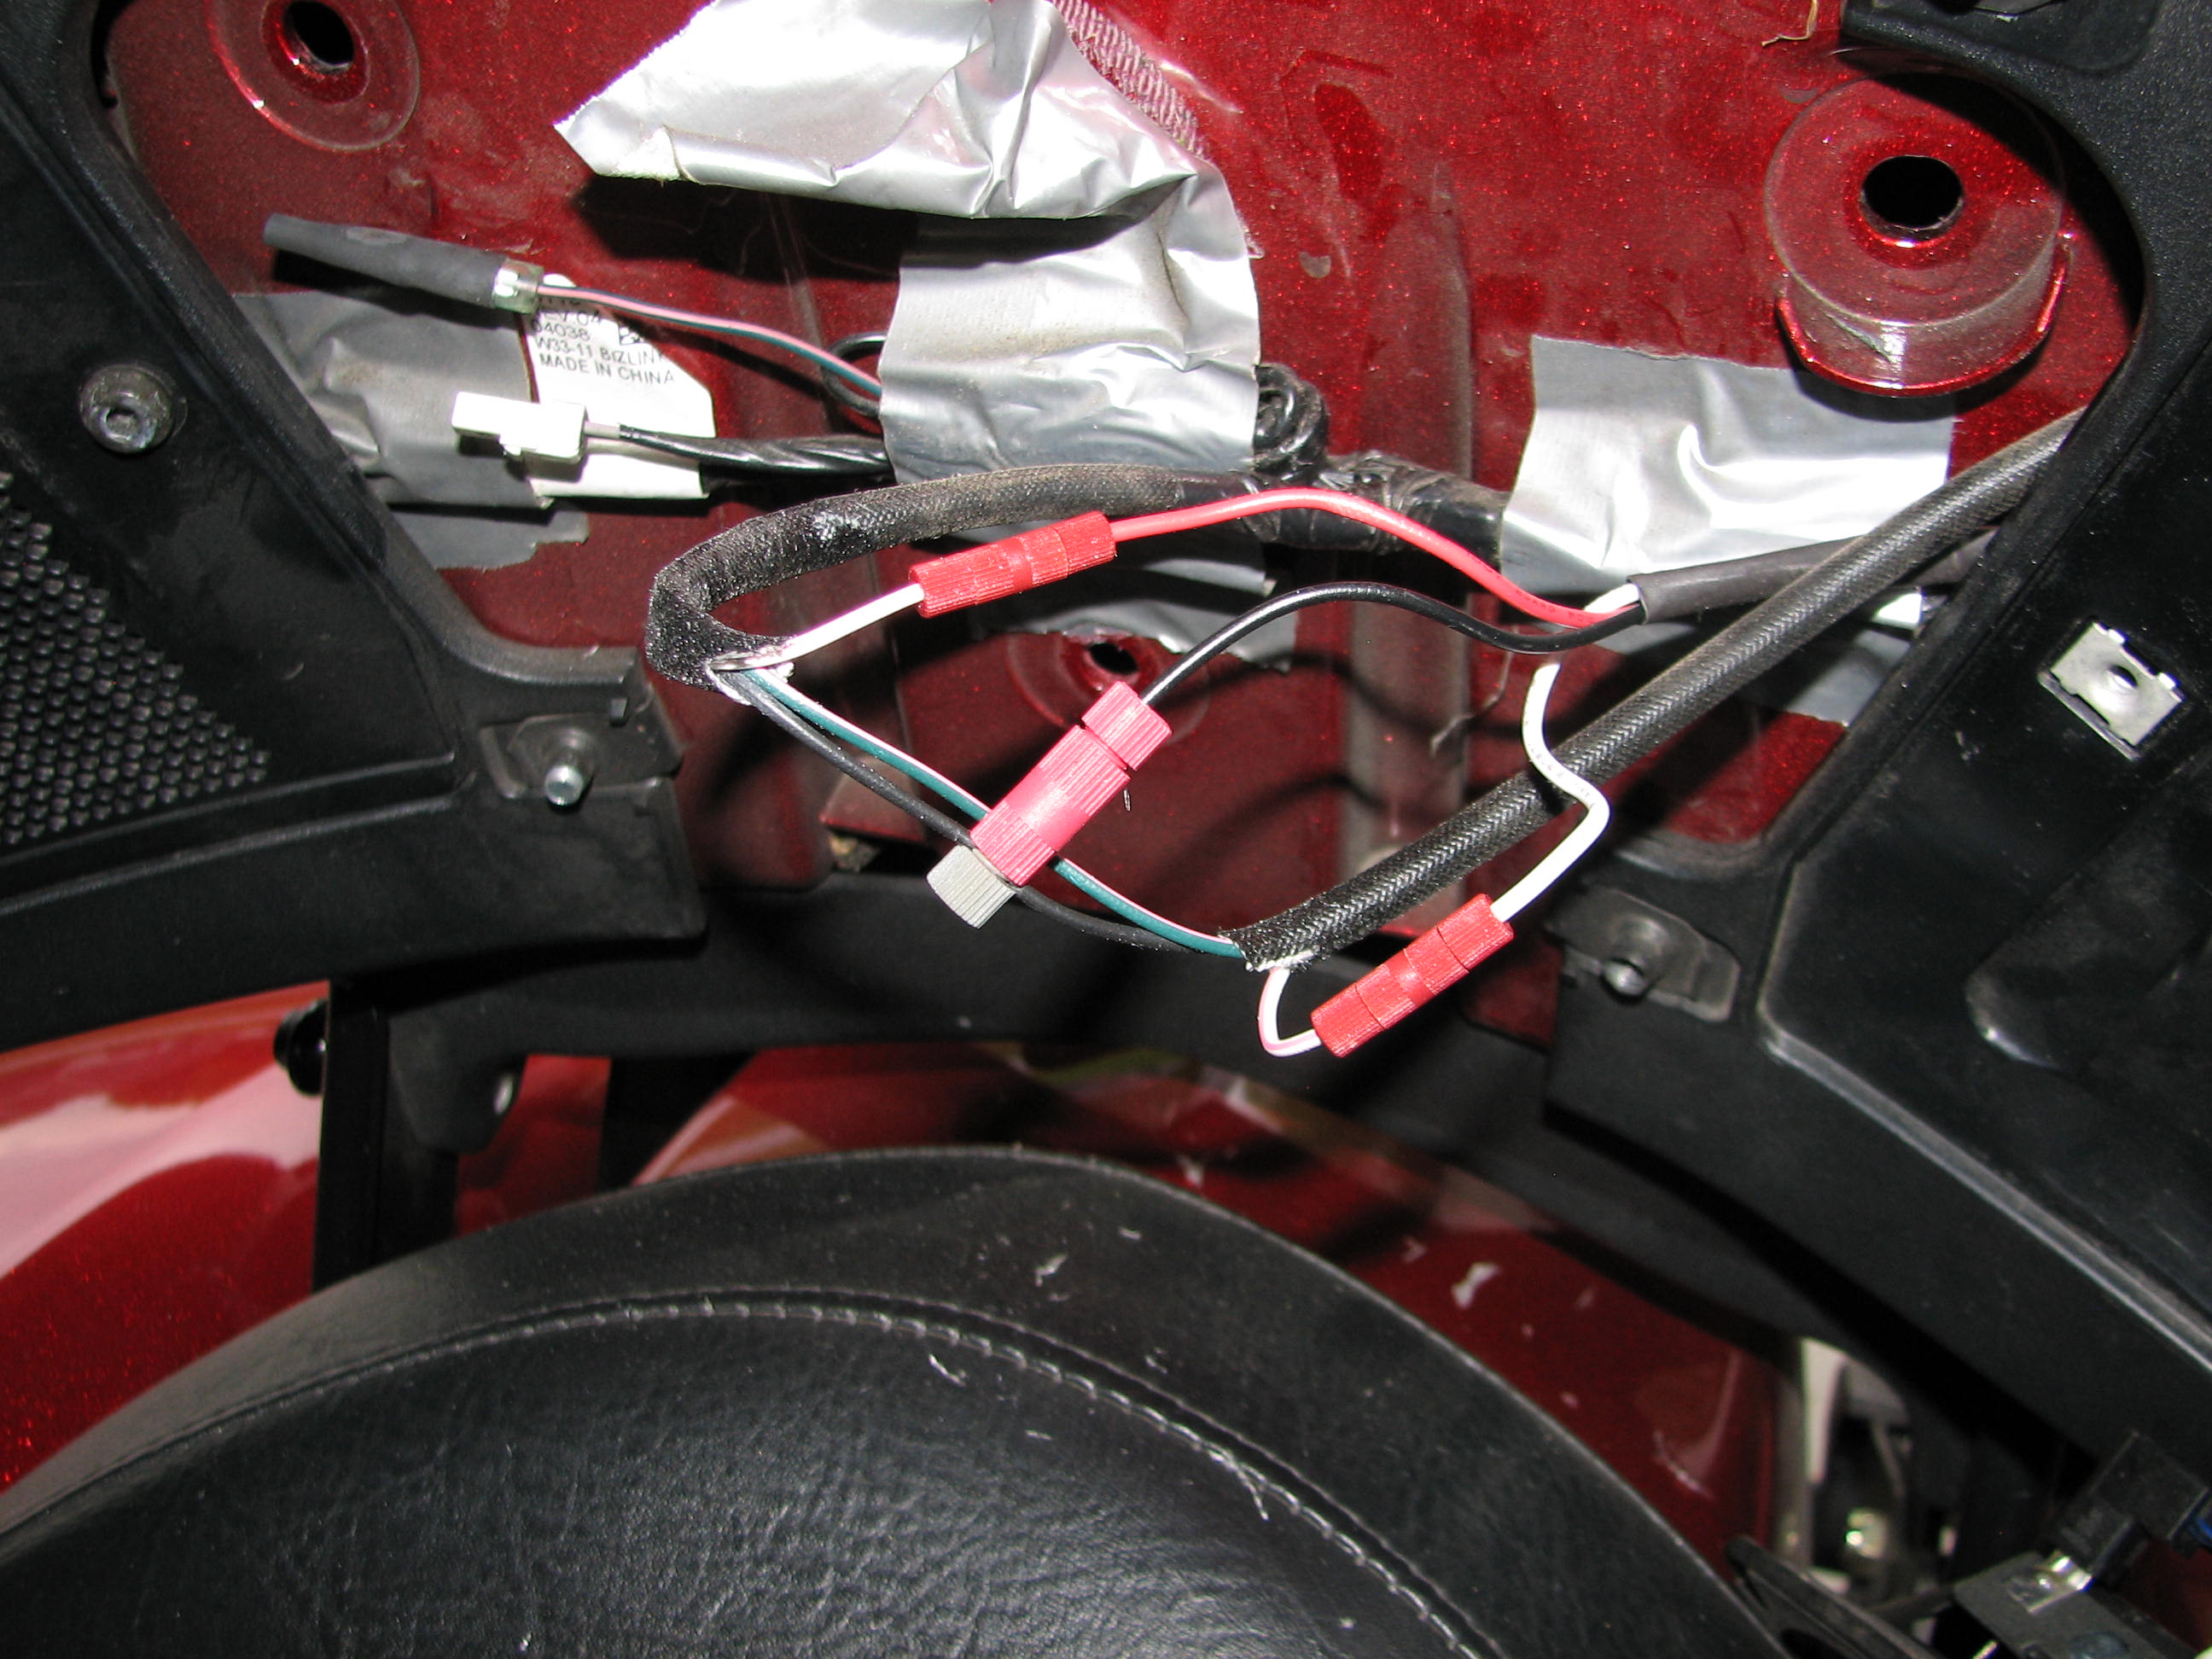
So, remove some insulation from the two ends of the snipped wire and, using the included Posi-Locks, attach the Magic Strobes' wires to the appropriate cut ends: the unit's red wire connects to the "Input Side," i.e., the end that comes from the taped-together bundle of wires, and the unit's white wire connects to the "Output Side," i.e., the smaller, sheath-only, end of that cut wire. Last, using the included Posi-Tap, attach the unit's black wire to the (uncut) stock black wire. This is what you'll end up with:
- Attach the Magic Strobes unit in place. After first cleaning the back of the unit and part of the topcase with alcohol, I used some automotive-quality two-sided sticky tape (not included) for this:

- Recover the cut sheathing and new wires. I enclosed, individually and then collectively, all of the wiring in some stick-to-itself stretchy tape, and then put the stock duct tape back in place. Note that the output wires are routed just below that curved lip of that upper-right bolt hole, and that the input wire and most of the new connectors are kept low, where there's a modest indent in the backrest pad:
- Button it up. Put the speaker, grill, and backrest back on.
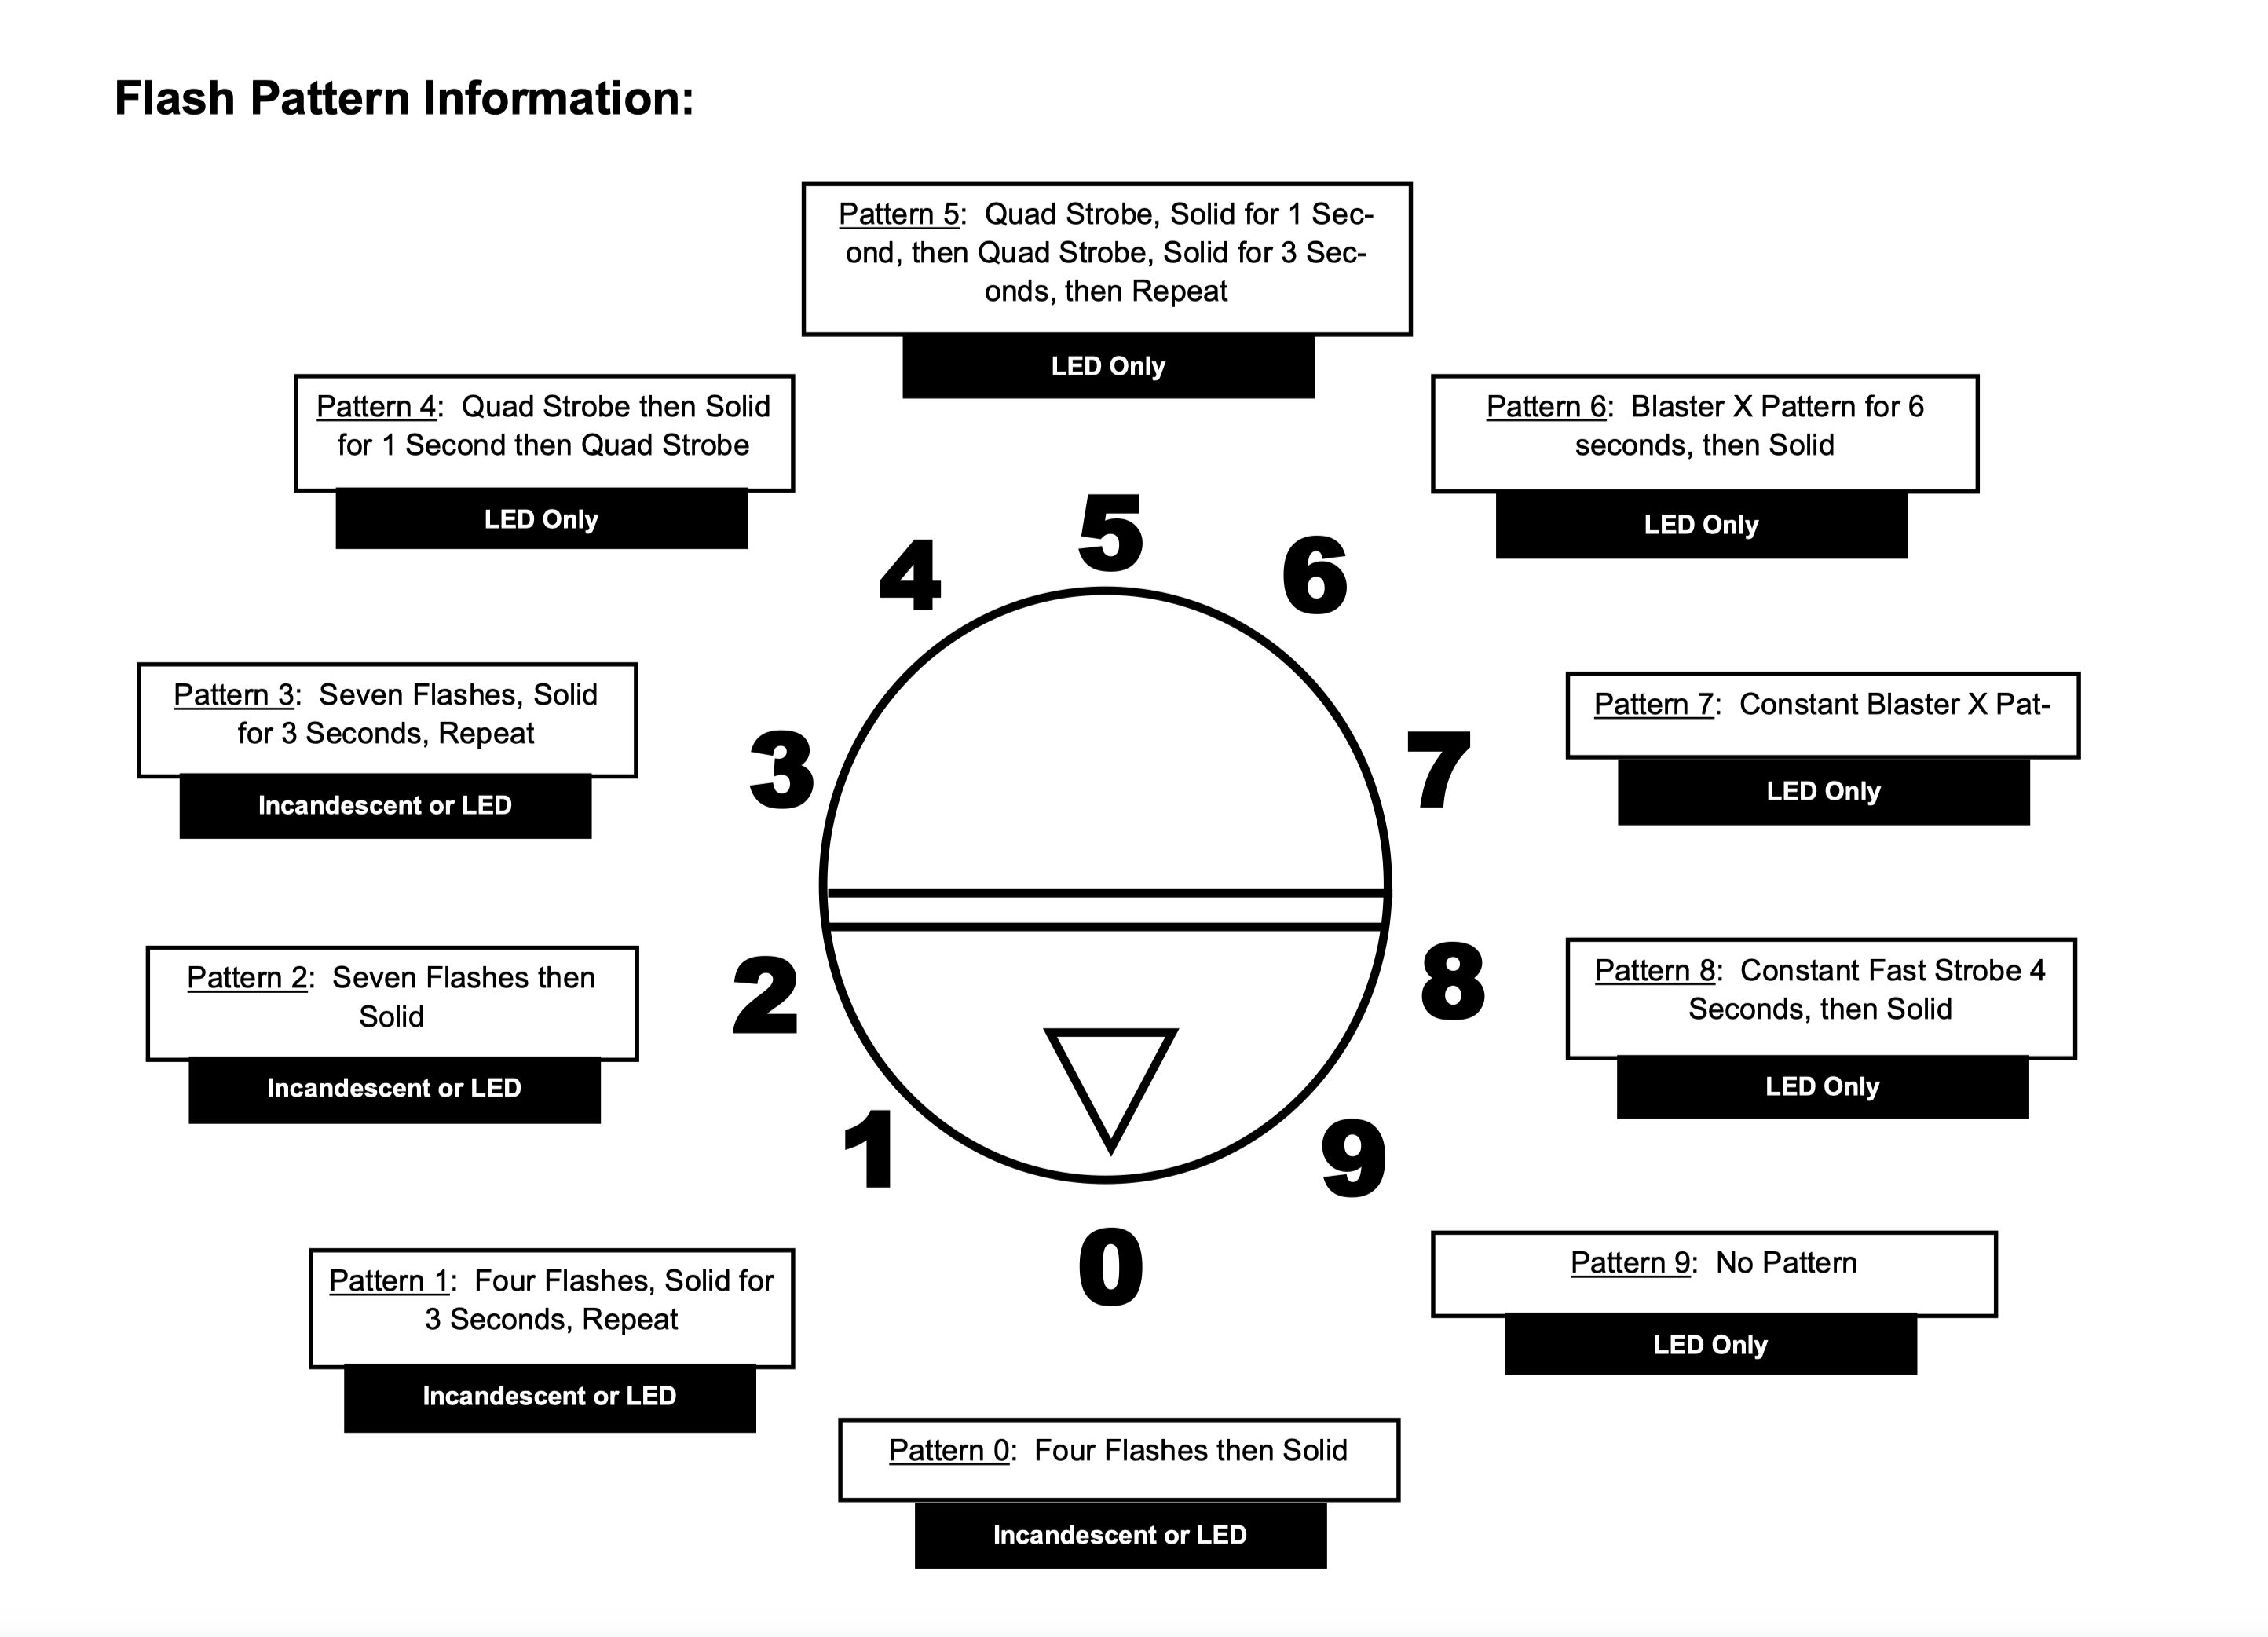
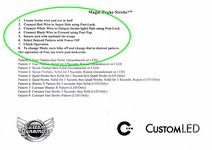
- Decide upon a flash pattern. Here are your choices:
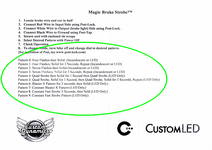
There is a little (hard to see) arrow recessed on the yellow shaft that indicates which pattern is chosen. I am a little disappointed that there is not an eleventh choice (or a substitute for an existing one) that would allow you to have a stock setup, i.e., not flash at all. You never know when some law enforcement officer or inspector might raise some objection. This happened to me during one annual inspection here in New York one year (with another product that flashed brake lights in a topcase on a scooter), and Hyper-Lites notes that California has its own rules on flashing patterns.
I chose 6, "Blaster X Pattern for 3 seconds, then Solid (LED Only)." On the one hand, I wanted an LED-only pattern to maximize the dazzle. On the other hand, I didn't want any pattern that continues repeating. Can you imagine how annoying it would be to the driver behind you, if you're stopped on a hill, at a long light or with heavy traffic, and you had chosen a repeating pattern of any sort? I think that proper etiquette would preclude that, just as, say, there are headlight-modulator suggested guidelines for those who alter the forward-facing lights.
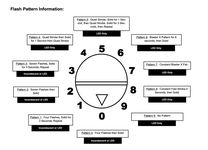
Update, January 2024:
In the latest version of the Magic Strobes, the patterns have changed slightly, and happily these now include a non-flashing, i.e., stock, position. I would still choose pattern 6, although it lasts a few seconds longer before going solid. Here are the new settings:
Custom Dynamics has a very short YouTube video that demonstrates one of the Magic Strobe patterns (I'm not sure which one) on an Indian motorcycle, if you want to take a look at that.
Here's a video I made of pattern 6 on my XCT. This is only approximately what it looks like; the lights are still red, courtesy of the red plastic lens, but the intensity and rapid changes of the lights conspire to overwhelm my Liquid Image Ego 727 action camera; thus, the lights appear to be white, instead of a bright red. (I tried this on another camera, too — an ancient Canon Powershot S2 IS — and it had a similar affect, except that the lights appeared yellow.)
That's it. If you tackle this yourself, good luck. Regardless, thanks for reading this, and I welcome your comments.
Bill Pollack
May 2014
Niskayuna, NY
|